Timesheets in AroFlo Field

Learn how to manage all of your timesheets in AroFlo Field

Updated on January 13th, 2025

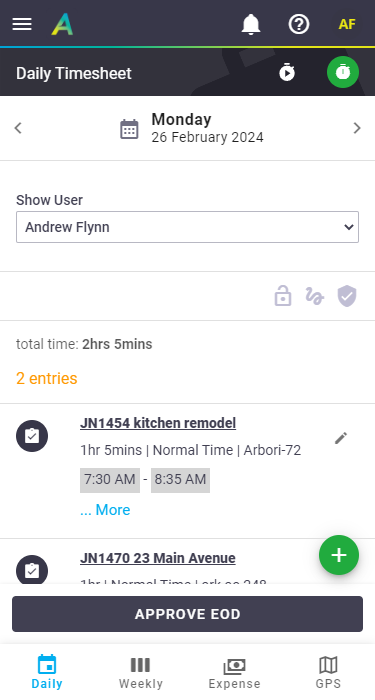
The Timesheet section of AroFlo Field is used for recording non-productive time (such as overheads) or managing user timesheets.

  • View timesheet entries created throughout the day as you've recorded labour on tasks
  • View specific automated timesheet entries, such as lunch breaks, if timesheet automation has been set up for your AroFlo site
  • Create additional timesheet entries not related to any particular task, e.g., annual leave, personal leave, trade school
  • View timesheet expenses created throughout the day or record new timesheet expenses
  • View GPS timesheet entries captured during the day
  • Approve daily or weekly timesheets for yourself and others (depending on your user permissions - see Approve daily timesheets below).

What do the icons mean?

In the timesheets area, three icons are used:

Icon Description
Overhead
  • Task/Quote timesheet entry, or
  • Timesheet expense recorded on a task/quote (not visible in Daily view)
Timesheet expense (not visible in Daily view)


Learn in AroFlo Academy


Record a timesheet entry

Timesheet entries can be recorded in two ways:

  • Using the start / stop timer.

    This is like a stopwatch. It can help you remember the time you started and provide an accurate timesheet entry. However, the timer must be started at the beginning of the event.

     
  • Manually added, using the fields under Timesheet > (plus).

    This can be used to create an entry at any time, including after the event.


Record a timesheet entry using the start / stop timer

1. Start the timer

When you arrive at the event:

  1. Go to Menu > Timesheet.
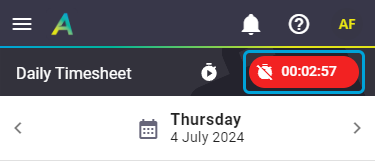
  2. Tap the timer on the top right of the header.
    The timer will start. Elapsed time will be displayed above the header.


2. Stop the timer

Once you have finished at the event:

  1. Go to Menu > Timesheet.
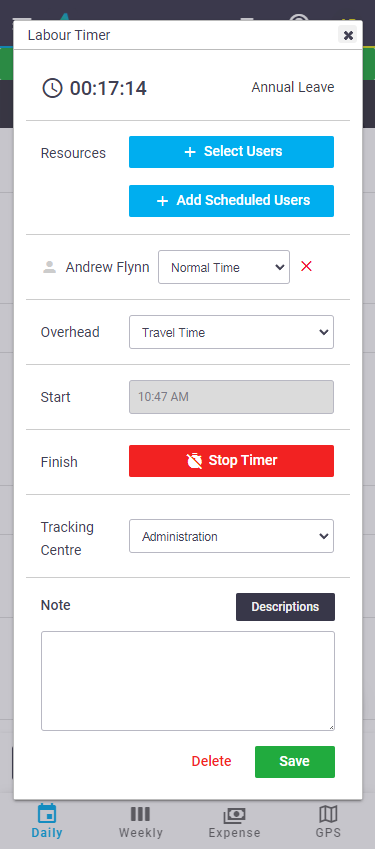
  2. Tap the elapsed time. The Labour Timer window opens.
  3. Tap Stop Timer.


3. Create an entry from the timer

You can preset any details below (like the overhead and note) while the timer is still running.


From the Labour Timer Window, confirm the fields required for a timesheet entry:

  1. To add another resource (user) to the timesheet, tap + Select Users. Select them from the list.

    Permissions

    Any user can view their own timesheets and enter their own records. Users in the Supervisor and Management permission group can also view timesheets for other resources and enter labor on their behalf.

    Custom permissions

    For custom permission groups, set permissions via:

    - Permission Groups > Users > Filters > Current User (set to unticked).
     - Permission Groups > Timesheets > Fields > Users > View (set to ticked).
     - Permission Groups > Task > Filters > Labour Created by or Assigned to User (set to unticked).


  2. The logged-in user is automatically added to the timesheet. Confirm the default work type.
  3. Confirm the Overhead.
  4. If the timer is still running, click Stop Timer.
  5. Record a Tracking Centre (optional) if they are used in your business.
  6. Record a Note (optional) - this is useful for recording supporting information such as the reason for taking leave.
  7. Tap Create Timesheet Entry.

    To cancel the timesheet entry and resume timing, click Cancel and close the window.


View all active timers

Managers, Supervisors (and those with permission) can also view active timers for other users.

  1. Go to Menu > Timesheet.
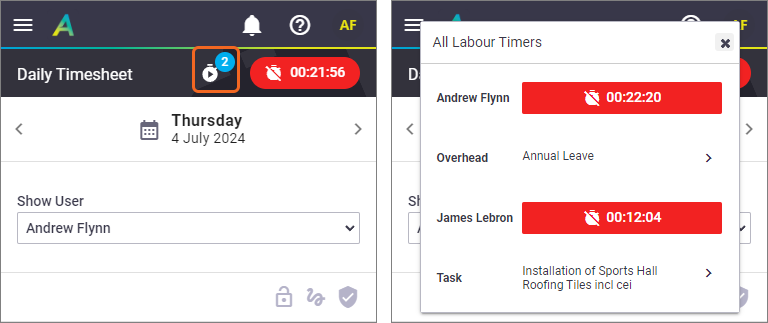
  2. Tap the Active Timers button on the top right of the header.

    This contains a counter to show you how many timers are currently running.

     
    From here, you can stop a timer, create timesheet entries, or add other users to an active timer.
  • Refer to the section above (Create an entry from the timer) for more information on the Labour Timer window.
  • Tap a task name to open the task.


Record a timesheet entry manually

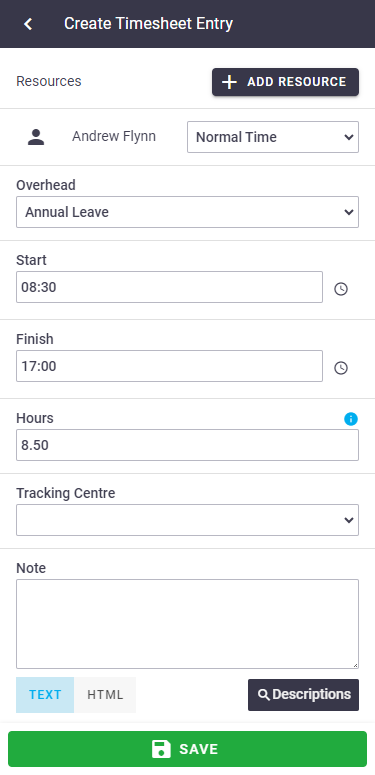
  1. Go to Menu > Timesheet
  2. Use the arrows, or the calendar button, to select a date. The system defaults to today's date, but entries can be backdated if needed.
  3. Tap (green plus)
  4. The logged-in user is automatically added to the timesheet along with a default work type.

    What are work types?

    Work types are not only used to define the various labour rates your business charges for services, but are also used for calculating overtime such as time-and-a-half or double time for payroll purposes. This list of work types may be filtered based on business unit or user settings. To view all work types, tap Show all at the bottom of the list.


  5. If you need to add another resource to the timesheet, tap + Add Resource and select a resource from the list > Select User

    Once added, resources can be removed from the timesheet by tapping (red X button).

     
  6. Select an overhead from the list.
  7. Enter time / hours using one of the following methods:

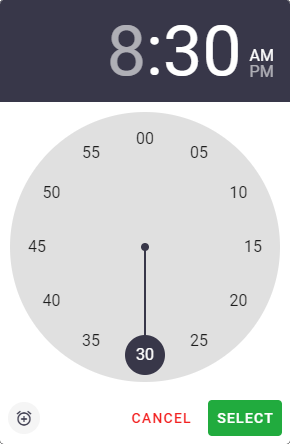
    Clock Widget

    Tap (clock icon), select the hour, minutes, am/pm, then Select.
    Current time

    If you make a mistake, tap to return to the current time.


    Manual entry

    Simply tap the field and enter the time using the keypad on your device.


    Hours

    If you don't want to record start / finish times, you can simply enter the total hours worked.


  8. Record a Note (optional) - this is useful for recording supporting information such as the reason for taking annual leave or personal leave. Tap Descriptions to use a description template.
  9. Tracking Centre (if configured) - this field will auto-populate with a default tracking centre, which can be used for reporting purposes.
  10. Save.


Conflicting time entries

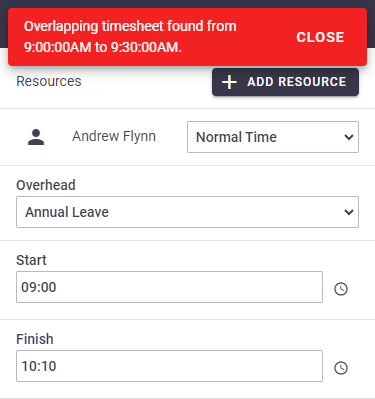
When you save a timesheet, AroFlo will check if the Start or Finish times conflict with any existing time entries. If they do, you will see a red error message appear at the top of the screen, indicating there are overlapping timesheets. You will need to amend the start/finish times before saving again.

Show this


Show this


Record a timesheet expense

The Expense area shows any timesheet expenses recorded against tasks and allows you to create additional expense entries.

To create a timesheet expense entry that's not related to a specific task:

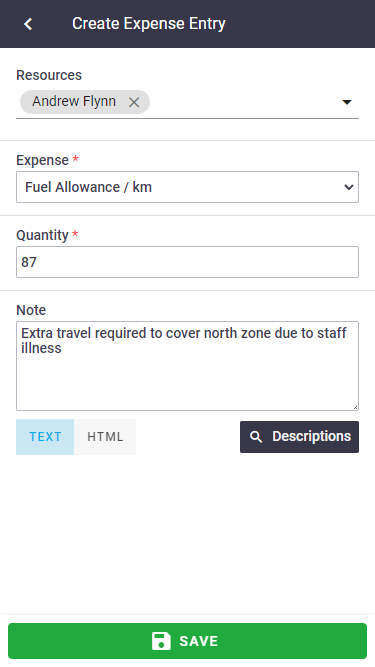
  1. Go to Menu > Timesheet > Expense.
  2. Tap (green plus). The logged-in user is automatically added to the timesheet expense. Add additional resources if you need to using the dropdown
  3. Select an Expense type from the list, e.g. Fuel Allowance / per km.
  4. Enter the Quantity, e.g. kilometres, hours, weeks.
  5. Record a Note (optional) - this is useful for recording supporting information, such as the reason for incurring the expense.

    Tap Descriptions to use a pre-defined description template instead of typing a note.

     
  6. Save.


Approve daily timesheets

Managers, Supervisors, and those with permission can approve their own or another's daily timesheet as follows:

Custom Permission Groups

For custom permission groups, Site Administrators can enable the EOD Approval button in Field via: 

Permission Groups > [Select permission group] > Timesheets > Fields > EOD Approvals > Add (set to ticked).

If you want the user to be able to unapprove their timesheet, also tick the Edit checkbox.


  1. Go to Menu > Timesheets.

    By default, the timesheet entries for the logged-in user appear. To approve a timesheet for someone else, use the dropdown underneath Show User.

     
  2. Review the timesheet entries.
    1. Use the (pencil icon) to edit the entries as necessary (depending on user permissions).
    2. Add any overheads necessary by completing the fields, as described in the previous section.
  3. Tap Approve EOD.

What happens once you've approved?

Once you've tapped Approve EOD, the timesheet is locked and no changes can be made. Timesheet labor entries and timesheet expense entries on individual tasks are also locked. If you need to make any adjustments after you've locked the timesheet, tap Unapprove EOD, make the changes, and re-approve.


Approve Weekly Timesheets

See Weekly Timesheet for information on weekly approvals.


View our Timesheets feature page on our website