|
Once a project has been created, you can edit the project details displayed in the project header, including any custom fields, and reorder the project stages if needed. You can also control the visibility of project documents on associated tasks from here, as well as close the project once it is complete. To open the Edit Project window:
|
 |
 |
Project Detail
The fields under Project Detail can be changed. Refer to Create a Project to learn about each field.
There are also some additional options when you edit a project:
Close the projectClosing a project locks down details and prevents any further tasks or invoices from being raised. The project can only be closed when all linked tasks have been marked as 'Completed' and all project invoices have been processed and finalized. To close the project, scroll down to Project Status and select Closed. Restrict client access to reportsThis setting lets you control the level of cost information in reports for clients who have permission to access your AroFlo site.
Edit ClientIf you've accidentally selected the wrong client for the project, you can change it by:
This will edit the client on all tasks, quotes, and periodics linked to this project, but not invoices. Edit ContactSelect a different Contact from the dropdown to change the main contact for the Project. When saving, you'll be asked if you want to update the contact for all tasks (and quotes) linked to the project, saving you from manually updating the contact for each task and quote. If you only want to update the project contact, select No. |
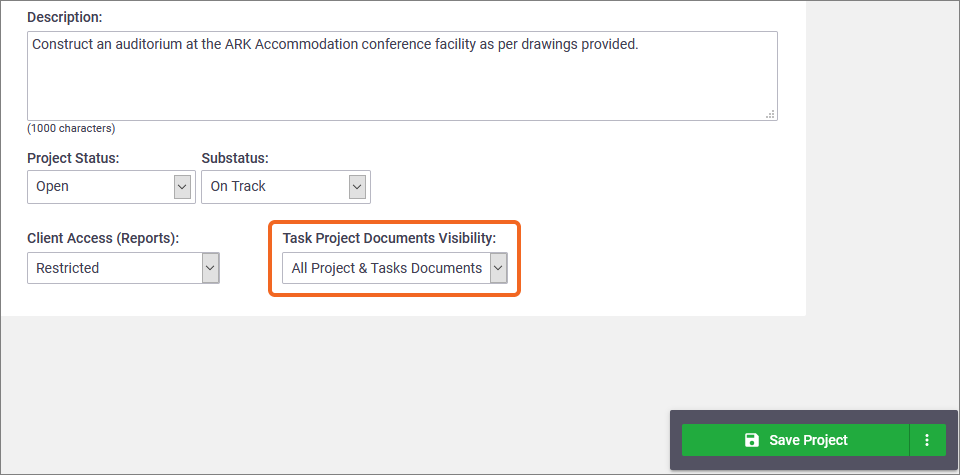
Set project document visibility on tasksUse the Task Project Documents Visibility setting to control the types of documents displayed within the Project Documents tab on a linked task. 
Delete the projectIf you want to delete a project, you will first need to delete all linked quotes, tasks, and invoices. Once linked information is deleted, you can click Delete Project (top right of the edit screen) and OK. Read more: Delete a Project |
||||||||||||||||
Set project document visibility on tasksUse the Task Project Documents Visibility setting to control the types of documents displayed within the Project Documents tab on a linked task. 
Delete the projectIf you want to delete a project, you will first need to delete all linked quotes, tasks, and invoices. Once linked information is deleted, you can click Delete Project (top right of the edit screen) and OK. Read more: Delete a Project |
Custom fields
Custom Fields will appear here as well, if set up. Edit the information for these if necessary.
Project Stages
The fields found in the Stages tab can be changed. Refer to Create a Project to learn about each field.
- Click a stage to view the stage details
- Click the
 (blue pencil) to edit a stage.
Reorder project stages
|
You can easily re-order stages on the project without having to change the original quote (if linked). Simply click and drag the
Delete project stagesYou can only delete project stages that contain no quotes, tasks, Gantt chart links, or invoices. To do this:
Icons explainedIf your project stages contain quotes, tasks, Gantt chart links, or invoices, you'll see the following icons, each with a number to indicate how many of each item the stage contains.
See Delete a Quote, Delete a Task, Delete a Dependency (in a Gantt chart), or Delete an Invoice for information on removing items from project stages to enable stage removal. |
 The 'Variations' stage contains no quotes, tasks, Gantt chart links, or invoices, and can be deleted. |
||||||||||
 The 'Variations' stage contains no quotes, tasks, Gantt chart links, or invoices, and can be deleted. |
Progress Settings
|
These settings let you set the default progress settings for this project as well as the default behaviour when creating an invoice and choosing the project default settings. See Progress Claims. |
 |
 |
Progress Summary
Select a default progress summary view:
- Project Overall - approved contract (quote) and variation total (ex. GST).
- Contract Only - approved contract (quote) total (ex. GST).
- Variations Only - approved variations total (ex. GST).
Progress Breakdown
Select a default progress breakdown:
- By Project (overall)
- By Stage
- By Tracking Centre
Calculation Method
Select a default invoice calculation method:
- Quote - % of Contract
- Task - Task Actuals
Estimated Completion Calculation
Select a default behaviour for the estimated completion box when using the % of Contract calculation method.
- Manual Input - The Estimated Completion per stage field can be manually updated with an amount for estimated progress
- Job Cost - The Estimated Completion per stage field will automatically update based on task costs divided by quote costs and cannot be manually overridden.
This field defaults to Job Cost, but you can change it.
Project Documents and Photos
|
Documents can be added to the Project using the Documents & Photos tab. To learn more, see Documents and Photos. The Task Project Documents Visibility setting (explained above) controls what documents are displayed in the Project Documents tab within a Task. Example: This is useful when you have a scope or schedule sent from the builder. You might want this available on every task linked to this project. |
 |
 |
 (two bars) icon on the stage and drag it up or down. These changes will be reflected in the Project dashboard and reports.
 (red bin).


