Performing a Job Safety Analysis (JSA) means looking at a work task, identifying the hazards involved, and putting controls in place to minimize risk and prevent injury. Worksafe Victoria provides information on how to conduct a JSA.
AroFlo lets you record the details of your JSA on a JSA worksheet via:
- Workflow > Compliance > Risk Templates or via
- Site Administration > Settings > Compliance > Risk Templates.
Create a risk template
Risk templates are used to create electronic JSA forms for your staff to access and complete on a task. Once JSAs have been established for particular tasks, they can be saved within AroFlo as templates, which can be used to create new JSAs as required. The following subsections explain how to create a JSA.
Add tasks/procedures
Select the category you need, or create a new category:
- Click the
 (plus sign).
 - Enter the name of the category and click Done.
- Click Add Task/Procedure.
Templates
The Task Template button allows you to import tasks from existing templates. Simply select a template from the list by double-clicking and clicking Import Template.
The Activities and Risks sections also contain the option to use templates.
- Enter the name of the task or procedure.
- Repeat the above steps for each task/procedure.
- Click Save.

The table below describes the headings you see across the top of the risk templates list.
Field/Option |
Description |
|---|---|
| Task/Procedure | Enter the name of the task or procedure. |
| Create JSA | Quick access to create a JSA form. |
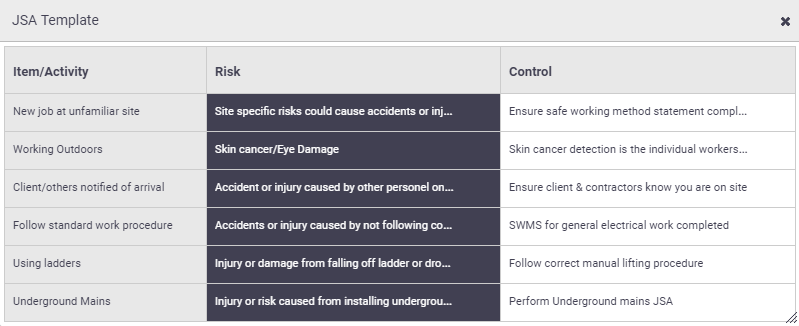
| View JSA | Provides a table view of the activities, risks, and controls that have been set up.  |
| Print View |
JSA: Provides a preview of the JSA layout. Checklist: Provides a preview of the JSA checklist layout. |
| Close Required | Check this option to prevent task closure if the form is incomplete. |
| Signature Required | Check this option to prevent closure of the form if it has not been signed off. |
| Contractor Access | Check this option to allow contractors to access this form. |
|
Send Edit Compliance Form Event Messages |
Check this option to allow event messages to be triggered each time this form is edited. |
| Show Activities Collapsed | Check this option to collapse a list of compliance activities so that only the headers appear. Within a task, click on a header to expand the activity. Activities that you've started but not completed will remain expanded by default. |
| Asset Required | Check this option to make it mandatory to assign an asset in order to close the form. This can be useful for asset-specific compliance documents. |
| Default Custom Layout | Used to link the form to a specific custom layout. |
| Checklist Labels | User-defined checklist labels for checklist items, e.g. Pass, Fail, N/A. |
| Risk Matrix Setup | Create a customized Risk Matrix. |
Add activities
|
 |
 |
Add risks
|
 |
 |
Add controls
|
 |
 |
Add checklist
|
 |
 |
Character limit?
Checklist Items have a character limit of 500 characters.
Checklist item settings
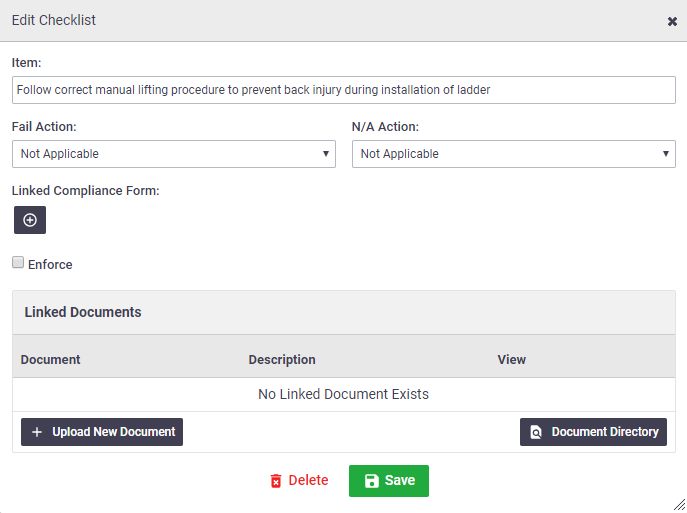
| Additional settings are available on checklist items via the Edit button. |  |
 |
| Field/Option | Description |
|---|---|
|
Fail Action N/A Action |
If the checklist is marked as 'Fail' or 'N/A', AroFlo can be instructed to: Generate Email – You can configure an email to be sent indicating the failure of this checklist item. The settings for this feature are in Site Admin > Settings > Compliance > Settings > Escalation. |
| Linked Compliance Form | Link a compliance form to this item. You can also link a risk template or a custom form. |
| Enforce | Ensures that the linked form is added to the item. |
| Linked Documents | Upload documents to the item if your AroFlo subscription includes document storage. |
Link forms to a task type
Linking forms to a task type makes it easier for Field users to locate the correct compliance form for the job at hand. See Linked Compliance Forms for how to set this up.
 on the left of the task/procedure you have entered.