Sending data to your cloud-based accounting package is a key component in setting up AroFlo. The following instructions show you how to access the integration menu and post data between AroFlo and your cloud-based accounting package.
Check our Comparison of Accounting Integrations to see what types of data can be transferred and how it appears in your accounting package.
Interested in learning through an interactive course in the AroFlo Academy?
Integration menu
|
Once the integration link has been configured for your accounting package, you can access the Integration Menu via Site Administration > Integration. Alternatively, if you have the Integration Menu enabled on your user profile, you can access it via Office > Manage > Integration. |
 |
For more information, see the Integration Menu section of Feature Access Settings.
Syncing data
| To sync data with your accounting package, click the Sync Data with (Accounting Package) tab. |  |
Typically when you access the Integration Menu, you will be taken directly to the 'Sync Data with (Accounting Package)' screen.
Data available to sync
| The sync data screen is divided into the tabs shown below. |  |
The tabs shown are dependent on your configuration and the Post Zones that have been enabled.
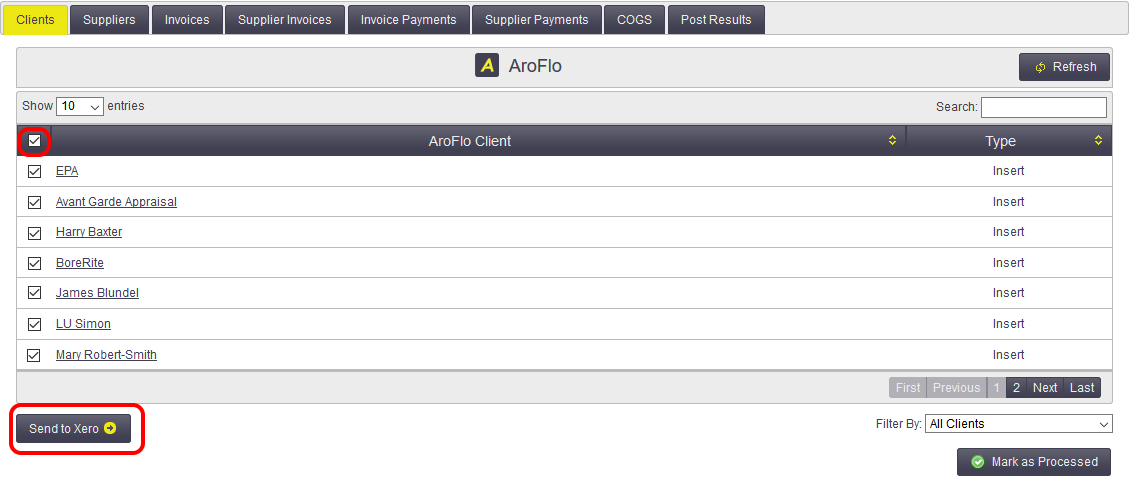
Clients
Lists new Clients and Clients with updated details that do not exist in your accounting package.
There are two types of synchronization:
- Insert: the client will be inserted as a new contact in your accounting package.
- Update: the client details in your accounting package will updated with new details recorded in AroFlo.
Suppliers
Lists new Suppliers and Suppliers with updated details that do not exist in your accounting package.
The two types of synchronization are the same as above.
Payments
Lists payments recorded against Invoices in AroFlo that do not exist in your accounting package.
Supplier Payments
Lists payments recorded against Bills (supplier invoices) in AroFlo that do not exist in your accounting package.
Credits
Lists Credit Notes recorded against Bills (supplier invoices) and client invoices that have an 'Approved' status.
Credits Applied
Lists credits applied and credit payments that have been allocated to client and supplier invoices.
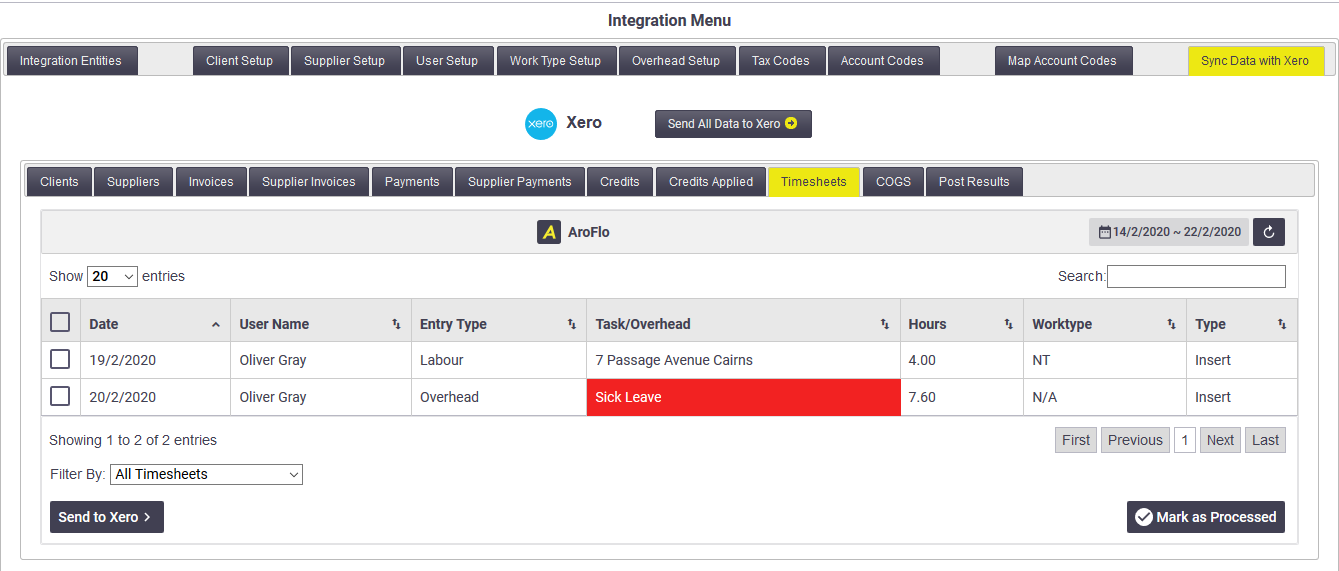
Add Timesheets
Lists verified timesheets that do not exist in your accounting package. For use with payroll.
Xero requires Payroll Access before the Timesheet Post Zone can be enabled.
Post Results
Displays a log of the communications between AroFlo and your accounting package, often used for troubleshooting issues.
For best results, you should work from left to right when posting data to your accounting package, i.e. post Clients, then Suppliers, then Invoices, etc.
Sending data to your accounting package
Clients and Suppliers
|
Before you can post invoices to your accounting package, you need to ensure that you synchronize your clients and suppliers. Client and supplier invoices are linked to a client or supplier. If the client/supplier doesn't exist in your accounting package, the invoice will fail to post across:
The posting process is the same for Suppliers, Invoices, Supplier Invoices, Invoice Payments, Supplier Payments and COGS. Only items marked as 'Approved' are displayed in each list. |
 |
Invoices and Supplier Invoices (Bills)
If an invoice line is highlighted in red, this means that either:
- The client does not exist in your accounting package. Please ensure you post your clients/suppliers before attempting to post invoices/supplier invoices.
- The client has been archived but still has this outstanding invoice. You can still post the invoice or mark it as processed.

Bill Documents
If using Xero and MYOB (AccountRight and Pro), Documents & Photos attached to Bills (e.g. Supplier Invoice PDFs) will also be posted across to your accounting package.
Things to note:
- Xero users will need to re-authorize their token before this feature will work.
- There is a maximum of 10 attachments per Bill
- Maximum file limit:
- Xero: 10MB
- MYOB: 3MB
- Supported file types:
- Xero: BMP, CSV, DOC, DOCX, EML, GIF, JPEG, JPG, KEYNOTE, MSG, NUMBERS, ODF, ODS, ODT, PAGES, PDF, PNG, PPT, PPTX, RAR, RTF, RTF/TXT, TIF, TIFF, TXT, XLS, XLS, XLSX, ZIP, 7Z
- MYOB: PDF, TIFF, JPG, JPEG, X-MS-PNG, PNG
Payments and Supplier Payments
Before you can post payments to your accounting package, you need to ensure the associated invoices have been posted across. If the invoice doesn't exist in your accounting package, the payment will fail to post (post error message: 'No Invoice Mapping Found').
Two-way transfer of payments
A number of our cloud-based accounting integrations support two-way transfer of payments. This means payments recorded in your accounting package via your bank feed can be posted against client and supplier invoices (purchase orders) in AroFlo.
Check our Comparison of Accounting Integrations to see if your accounting package is included.
To post payments from your accounting package to AroFlo:
- Click the Supplier Payments or Invoice Payments tab.
- Enter a date from and date to (limited to a 7 day period) (far right).
- Click Get (Accounting Package) Payments.
- Select items individually by clicking the checkbox next to each item's name. Alternatively, you can select all items by clicking the checkbox at the very top.
- Click Send to AroFlo.
How does AroFlo handle payments when transferred?
If a payment does not already exist for an invoice/purchase order in AroFlo, the payment details from your accounting package will be inserted into AroFlo using the default Payment Method set in Site Admin, and the payment is marked as 'Processed'.
If there is an existing payment for an invoice that has the same Invoice No, Date and Amount as the payment in your accounting package, then AroFlo will auto-map the payment and mark it as 'Processed'.
Processed payments are excluded from the payments listed for your accounting package (shown on the right).
Payment surcharges
If you want to include surcharges when posting client payments, please check the Map Account Codes section to see if a surcharge account code has been mapped.
Transaction Type |
Transaction |
Account Code |
Tax Code |
|---|---|---|---|
| Sales Invoices | Surcharge Sales | Surcharge Account or general sales account if not specified | Use a taxable code as default |
Updating payment on processed invoices
If an invoice was processed prior to recording the payment in AroFlo, the invoice status will automatically revert to 'Approved'. If surcharges were included, a line item for the surcharge value will be inserted.
Depending on your accounting package, you may be able to re-post or manually process the invoice.
Updating processed invoices in…
Xero
|
To post invoice updates to Xero, you must ensure the Invoice Status (located in the Integration Menu) is set to Authorized. This setting allows Xero to post the updated invoice (as long as the invoice has not been voided and no prior payments or credits have been applied to this invoice). |
 |
MYOB, QuickBooks, Reckon
|
MYOB, QuickBooks and Reckon do not allow invoice updating. The invoice will need to be deleted from the accounting package in order to re-post the invoice with the surcharge. Alternatively, the invoice could be manually adjusted in both systems and marked as 'Processed' using the Integration Menu. |
 |
Timesheets
|
Supported packages Timesheet Integration is available with:
Timesheet Entries shown
To post timesheets to your accounting package:
Xero processed timesheets A timesheet entry can only be sent once to Xero. Once sent, timesheet entries will be marked as 'Processed' in AroFlo. If a timesheet entry is marked as 'Processed', it will not appear in this list. Timesheet entries that have been sent to Xero can be found as drafts in the Post Results tab. These can be modified in Xero. |
 |
What are Account Codes and how are they used?
|
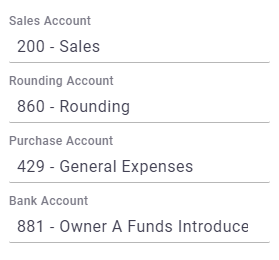
In accounting packages, the unique identifier linked to each account is called an account or GL code. When you perform a transaction in AroFlo, if you've linked your account codes to these transaction types (like a sales invoice or a supplier bill) the value of these transactions will route to whichever account code you have linked when you push that invoice or bill to your accounting package. You will likely have the account code mapping for the following accounts:
Your needs may vary such as requiring an account code for tracking subcontractor labor costs or the purchase or hire of specific equipment, so your mappings may vary from the basics. |
 |
Additional Resources
For more information on elements of your accounting integration please refer to the below resources, or contact our customer support team for assistance.
Where do account codes show up in AroFlo?
Once your integration has been completed, you will be able to see your account codes that you have chosen appear in the account code selector on an invoice or bill in AroFlo.

Why do we have to map a rounding account?
Accounting packages may calculate total invoice amounts including tax slightly differently. The rounding account is designed to detect any variance with rounding from a source like AroFlo to make sure both totals balance when the account is received.
For more detailed information, including a more in-depth description on how AroFlo handles rounding please see Accounting Tax Rounding.
What if my account code requirements change?
If you or your bookkeeper or accountant decides it's time to change the way your chart of accounts operates and you believe this may have an impact on your accounting integration, please let our friendly customer support team know and we can see what we can do to assist.