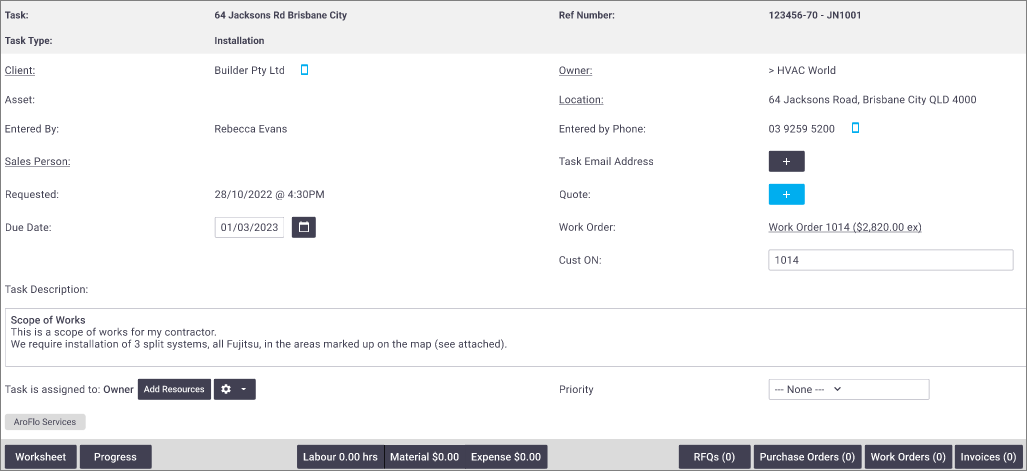
When a work order comes into your AroFlo and you accept it, you will create a Task (job) to work on. Tasks are like a briefcase full of all of the work you've done on that job so far. When you're finished, you can then invoice the work you've done, send it to your Client and get paid.
You're going to see us refer to Office and Field a lot as we step through the workflows:
| Office | Field |
|---|---|
|
Generally, this is where you do administrative work like checking on Tasks you've been working on, invoicing, or auditing your inventory. This is done on a computer or laptop. Access your tasks using Workflow > Tasks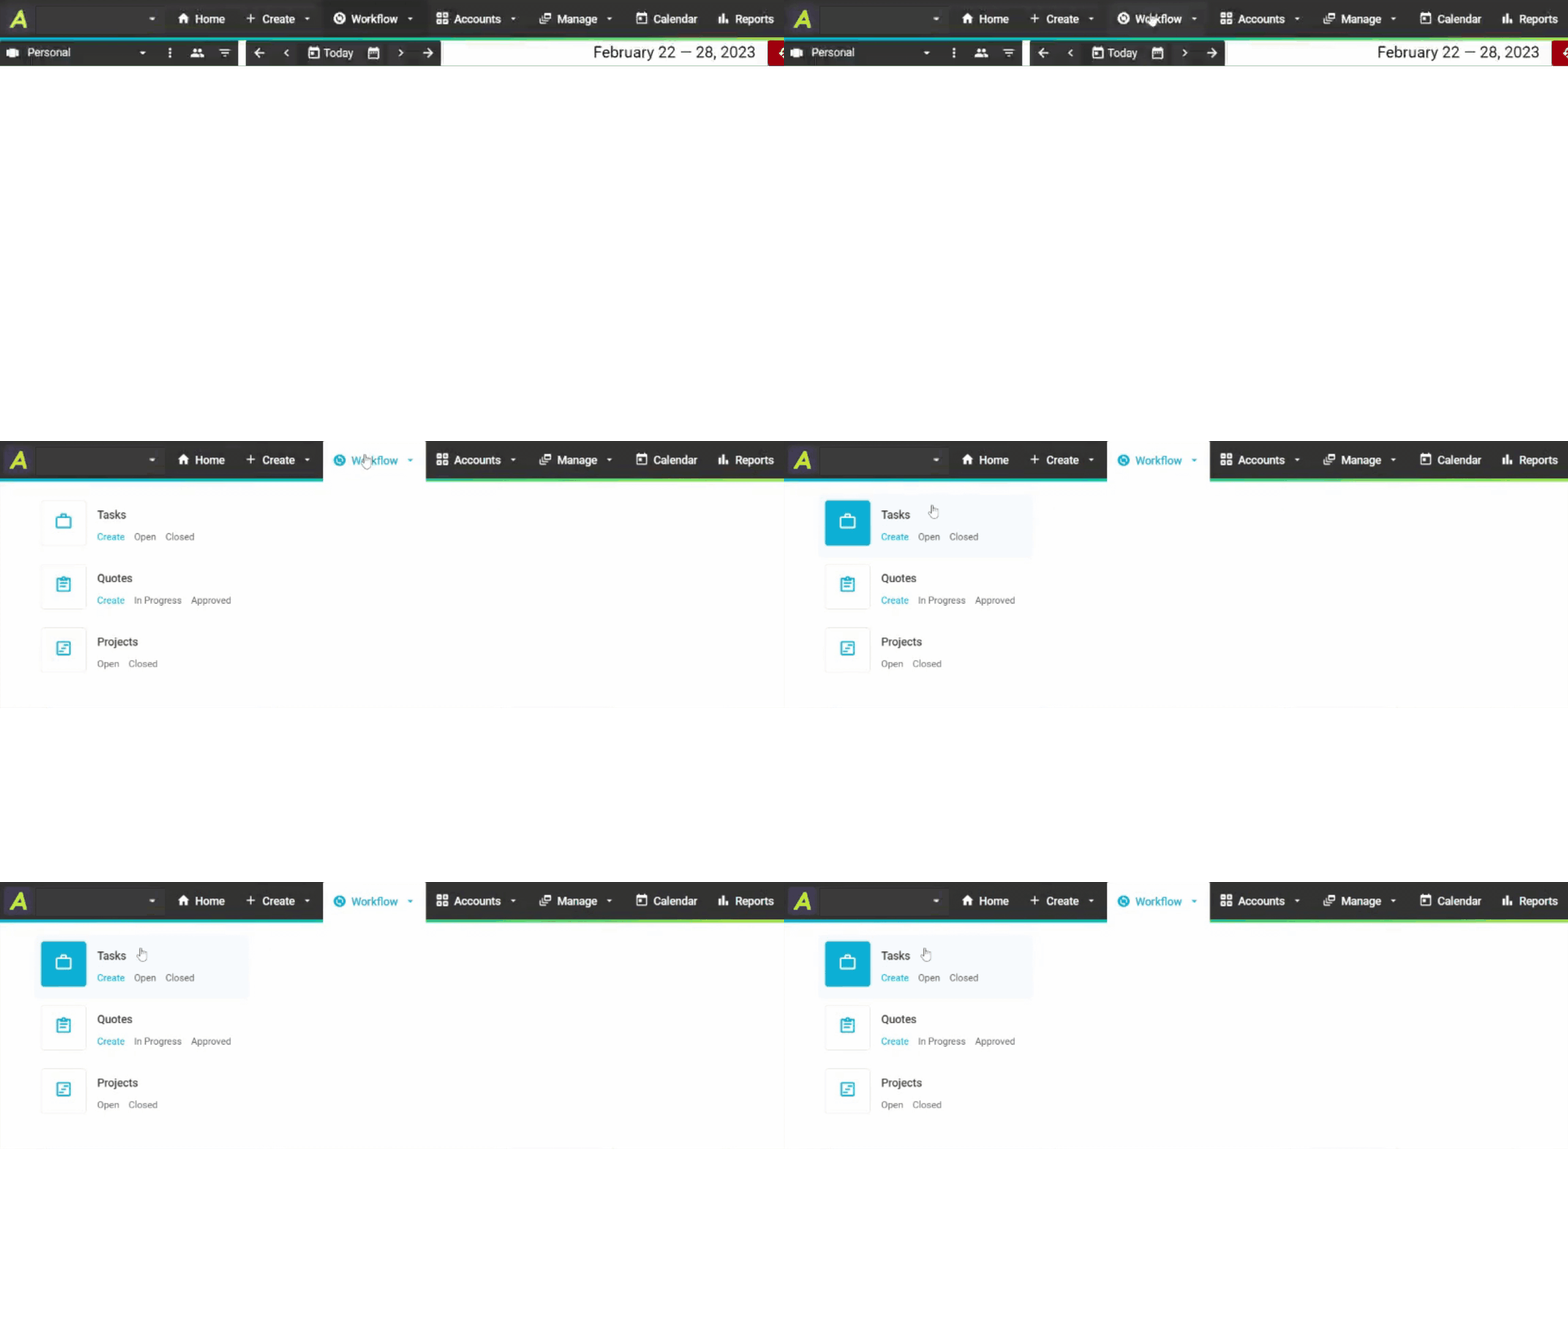 |
Generally, this is where you do the work on a task on your mobile device including adding labor, material costs and taking photos. Access your tasks in Field using ≡ > Tasks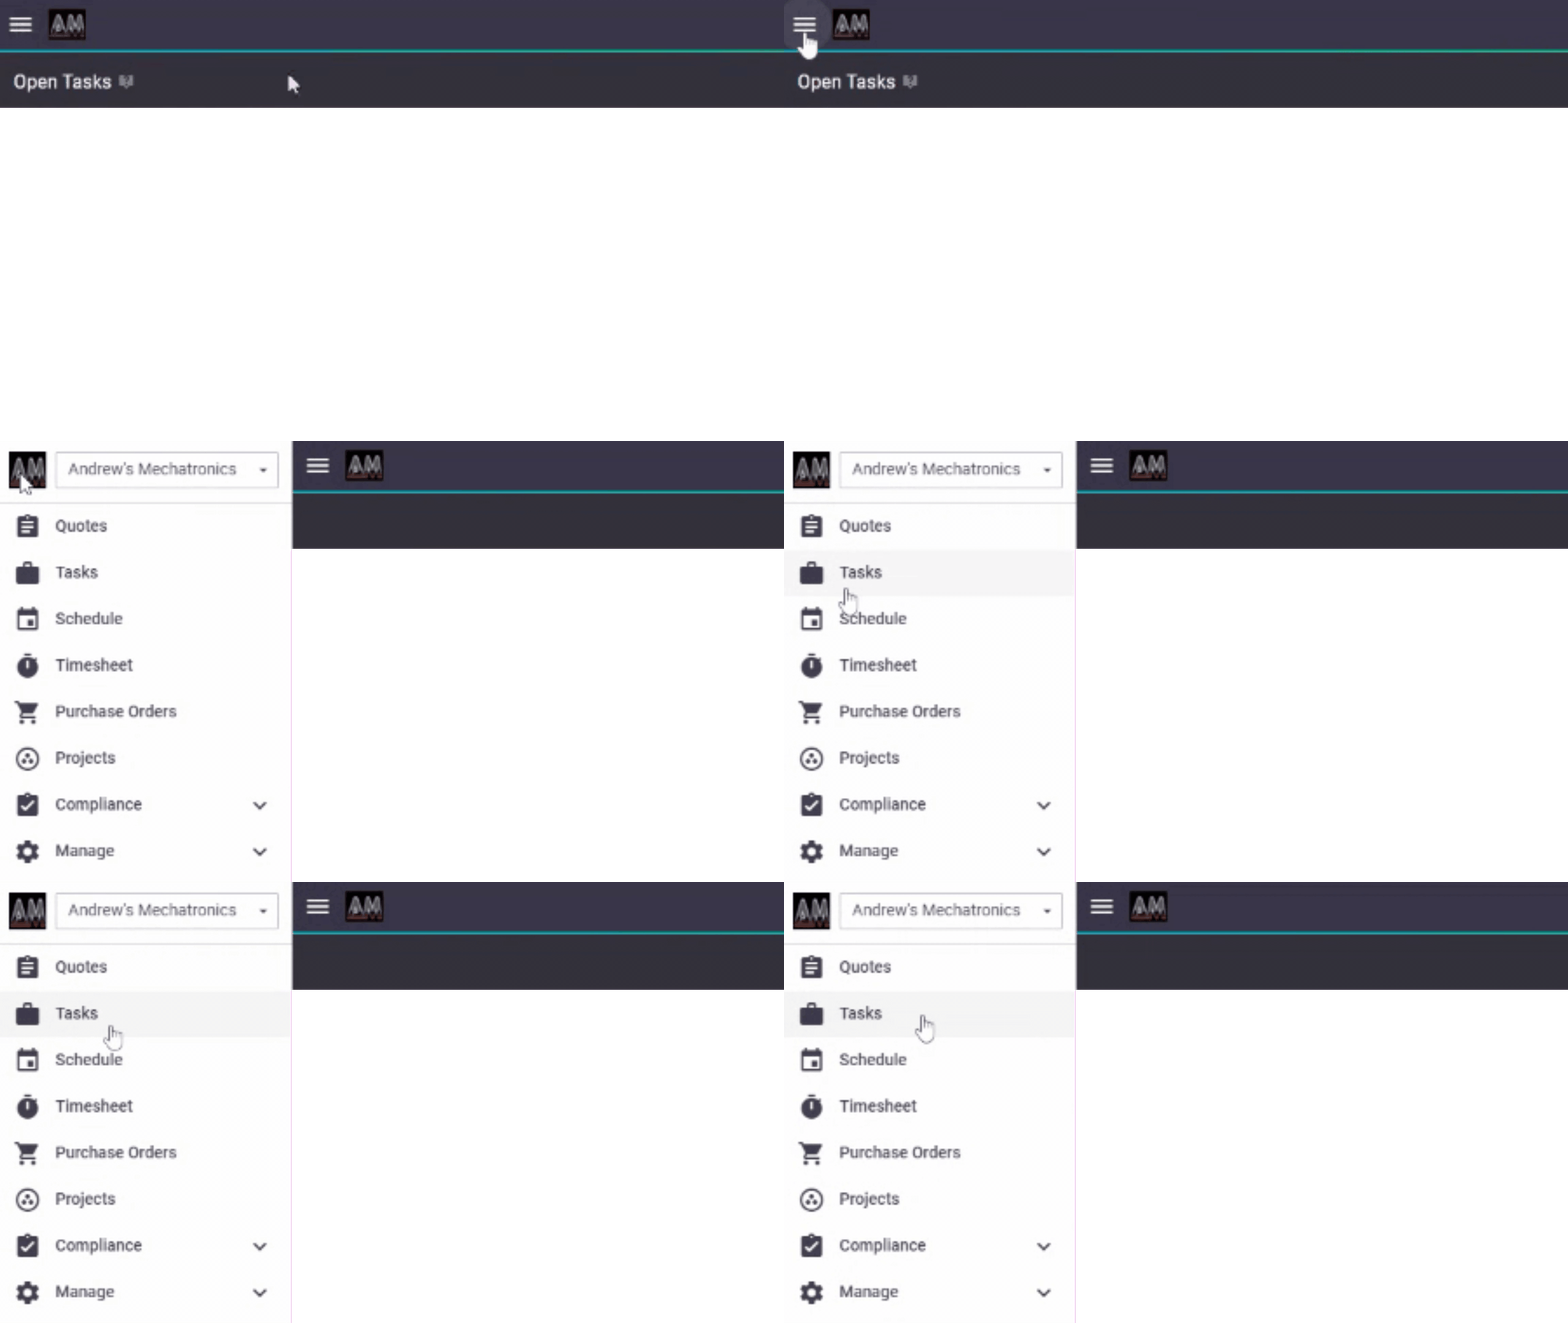 |
Using AroConnect, your work will come in as work orders which you will be able to accept or decline. If you haven't connected to AroConnect, or are not quite sure how to manage your work orders as they come in, please see Sending or Receiving AroConnect Work Orders.
What would you like to learn about?
As the accepted work order will create a task in your AroFlo we'll discuss that first; however, if you'd like to read about how to work on a task straight away then read "How Do I Work on a Task in Field?".
Office
How Do I Work on a Task in Office?
Before the job begins
When the task has been created in your AroFlo there are a couple of things you can do to make your experience in Field easier:
Schedule your task:
Scheduling your task to the calendar means you and your users will be able to see it in Field and plan their day accordingly.
or,
Add Documents and Photos
Documents can be uploaded from your file system or you can take photos and video directly from AroFlo on your mobile device, laptop or desktop computer using a webcam. You can even simply copy and paste images from your computer's clipboard. If you need to send images to your client, you can download them individually or as a zip file.
The documents and photos functionality is only available if you have Document Storage enabled for your AroFlo subscription. To find out more or to activate this feature, please call AroFlo Customer Support or log a support request.
Upload a file
- Navigate to a Task in Office (Workflow > Tasks > Click the Task name).
- Click the Documents and Photos tab.
- To upload to a folder, click on the folder name, or just click + Add Documents and Photos.
- Click Upload.
You can also simply drag and drop a file into the Upload window to upload it from your File Explorer or Finder.
- Use the file explorer to double-click, or single-click a file and then click Open.
- Click Done once the upload completes.
There is no limit to the number of files you upload, but AroFlo does limit file size to 250mb.
What would you like to learn about?
How do I download or view my task documents?
Download or view task documents
To view a document such as Word, Excel or PDF, click the thumbnail or name of the document.
When images are uploaded to the Documents & Photos tab, the top section will also display a thumbnail preview of all images.
Viewing Thumbnails
The thumbnail preview bar is hidden if there are no images. If you've uploaded an image to an asset, inventory item, or client card and you don't see the thumbnail, click  and select Thumbnail.
Thumbnail previews are not available for documents such as Word, Excel and PDFs. Supported file types that will show a thumbnail are .pdf, .jpg, .jpeg, .gif, .png, .bmp.
How do I search, filter or sort my task documents?
Search or filter task documents
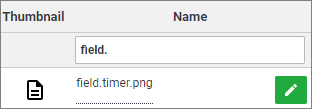
The search tool located at the top of the document list allows you to search and filter by document name, comment, filter, uploaded by and category.
Simply enter a keyword into one of these fields and the documents list will automatically display the documents that match your criteria.
The list can also be sorted by clicking the column header.
How do I rename a file or add comments?
Rename a file or add comments
To rename a document or photo, click the edit button  (pencil icon) in the Name column. Update the Document Name and Save.
File extension
The file extension (e.g. jpg) will be shown but is read-only and cannot be edited.
Add comments
Comments can be added for each file using the Comment field. These comments can also be referenced if photos are added to layouts including quotes and invoices.
How do I set the visibility of files so I can control who sees them?
Set document visibility
Once the file has been uploaded, you can set the access visibility from the Filter options.
Access visibility restricts who can view the document. The available options are:
- Internal Only - visible only to internal staff.
- Internal Admin Only - visible only to internal staff with Admin user permission.
- Internal Admin and Manager Only - visible only to internal staff with Admin or Manager user permission.
- Show Client - visible to your clients that have a client login / visible to clients in the Online Quote Viewer.
- Show Contractor - visible to your subcontractors that have a contractor login.
- Show All - visible to all users who can access your AroFlo site.
If you want to include a specific document or photo on a print layout or email, you will need to set the filter to 'Show Client' or 'Show All'.
A document or photo set as 'default' will appear on layouts and emails if chosen (regardless of filter setting).
How do I share a document or photo?
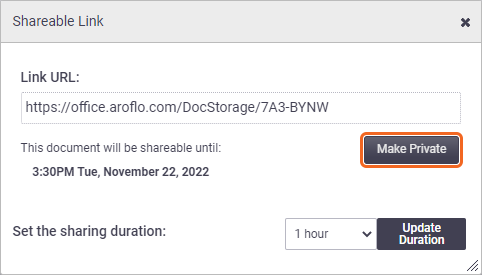
Documents and photos can be shared with external contacts using shareable links. Shareable links can be included in an email or a document. You can enable or disable a link at any time. Alternatively, you can set a sharing duration which will automatically disable the link when the duration has ended.

Create a shareable link
- In Documents and Photos, search for the document or photo you want to share.\
- Click
 (Get Shareable Link)
 - Select a duration from the dropdown list beside Set the sharing duration.
- Click Set Duration. The screen will update to show the expiry of your shareable link (see next image)
- Copy the Link URL and paste it into an email.
- Click X to close the Shareable Link window.
Refresh the page with the documents and photos table. The expiry date for the link will also appear under the Public Expiry column. Expiry only applies to users not logged into AroFlo.
Disable a shareable link
- In Documents and Photos, search for the document or photo which will no longer be shared.
- Click
 (Get Shareable Link).
 - Click Make Private. The screen will update to show 'You must be signed into AroFlo to access this document'.
- Click X to close the Shareable Link window.
How do I delete a document or photo?
You can delete a file from Documents & Photos areas using the  (red trash can).
How do I download my files?
Download files
Any documents or photos you have stored in your AroFlo site can be downloaded as zip files. The option to download is available in most areas of AroFlo, e.g. Tasks, Quotes, and Invoices, and you can choose which files to download, or download all.
- Navigate to any area of the system that has a Documents & Photos area.
- If the area has categories, select the category or sub-category the file is stored in, or choose All Folders to view all.
- From here:
a) Select the files you want to download using the tick boxes on the left, and then click Download Selected Documents & Photos, or alternatively
b) to download all files, click Download All Documents & Photos. - Wait for the files to be downloaded as a zip file
Popups
You may need to allow popups, depending on your internet browser settings. Alternatively, click Download to bypass this step. - Locate the files on your local drive. From there, you can rename them if required.
I'm the Contractor. I have finished the job and need to raise an invoice
After finishing a task in AroFlo Field. You can efficiently complete a simple invoicing workflow to get paid.
- Navigate to Workflow > Tasks > Closed.
- Click the name of the Task you'd like to invoice.

- Scroll down and click Create Final Invoice.

- At this point you have a couple of different ways you could add line items to your invoice based on the work you have performed:

Mixing Work Order and Jobsheet Items
If you would like to use a combination of work order items and items booked out on your job sheet (like materials you had to buy or extra labor you or your employees had to book) click Add All Jobsheet Items to add everything off your jobsheet and then Add Work Order Item, click the item to add, and then Select Work Order Item. After you have added all of your desired work order items, close the window and continue with your invoice.

- After adding your line items, you will have a final value. This can be tweaked using the Qty (how many units of the thing you are selling), Cost (what those things cost you per unit) and Sell (what you are selling those things for per unit) values to fine-tune the total:

- Track your invoice total using the Summary below the line items.

- Once you're satisfied with the total, change the Status to Approved and then Save.
- Finally, click Send to Client Name (
 ) and the client will receive a Bill automatically based on your invoice so you can get paid.
If you forget to include something on the original bill and have already sent it, change the status of the bill back to In Progress, make your changes, Save it and send it to the head contractor again. They can then delete the out-of-date bill on their end and your totals will balance.
I'm the Client. How do I receive bills for the work I am sending to my contractors?
These steps represent the core workflow of receiving an AroConnect Bill from your subcontractor. For in-depth information regarding preparing a bill please see: Create a Bill.
Your contractors are able to send you bills attached to your work orders so there's very little you will need to do. Your AroConnect primary contact email address will receive a notification that an invoice has been received:
- There are two methods to find your AroConnect bills in AroFlo:
a) Click Workflow > Work Orders > Accepted. Work orders with bills will
have a Bill Number visible in the appropriate column. Click this to be taken
to the bill worksheet.
b) Click the View Bill in Office button in the email you will have received ( ).
). How does AroFlo choose a Bill Number?
The bill number is reflective of the subcontractors' invoice number in their own AroFlo. If you ever need to query them on something on a bill you receive from them, quote this number. - When you arrive at the bill worksheet, most fields such as Description and Contractor Invoice Number will be pre-populated. You can make changes to these fields as necessary:
- Check your line items to confirm they match the work order. If the contractor has added an item to the Bill they send you that did not exist on the original work order, you will see an icon that looks like this (
 ) on the work order.
 - After you have selected your line items and made sure you've accounted for the work order items you have received a bill for, click Status and change to Approved.

- Click Save.
What happens next?
If you have an accounting integration set up, you're ready to send your bill to your accounting package to be paid. Either way, you can rest assured that your job costs are aligned properly as you'll be able to not only see the amounts you have been billed for on your task worksheet in the Labour and Material tabs but also track the items you have and have not billed on the original work order.

Field
How Do I Work on a Task in Field?
When you're working on a Task in AroFlo Field, you're providing information for yourself later to follow up on. There are lots of tools to use but a core set of steps you can follow if you're new to the system to help you get a feel for the rhythm of a job:
- Log into AroFlo Field on your device.
- Assuming you have scheduled your task then tap ≡ > Schedule.
- Click the task you've scheduled and you'll be taken to the worksheet.
(If you have not scheduled your task, simply click ≡ > Tasks, then the name of the task.)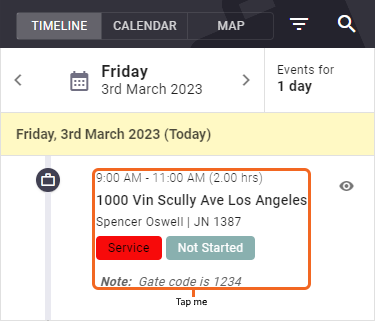
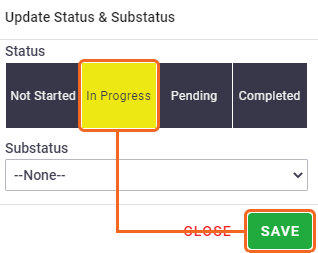
- Change the status of the task using the button in the top right
 . Remember to do this again if you finish the task. If you need to return later you can set it to Pending as a reminder.
- Start a timer (
 ) to easily capture a timesheet when you're done for the day. This allows you to invoice out the times you've spent working on the job without having to manually enter them.
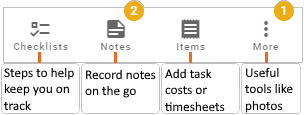
 - You decide what feature to use next depending on your own needs, but you'll always use the worksheet menu to get there. You can find this at the bottom of the screen:
Checklists
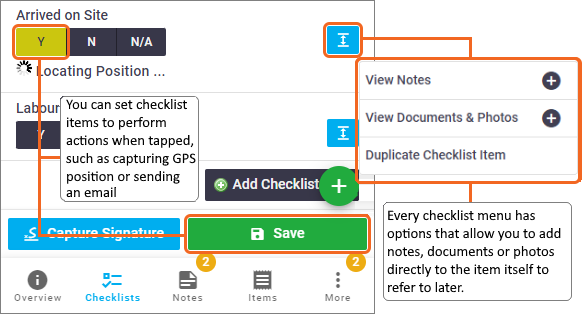
On a checklist, simply tap Y, N or N/A on the items as they appear to provide clarity of either where you are in a process or to record a specific milestone you have reached.
Notes
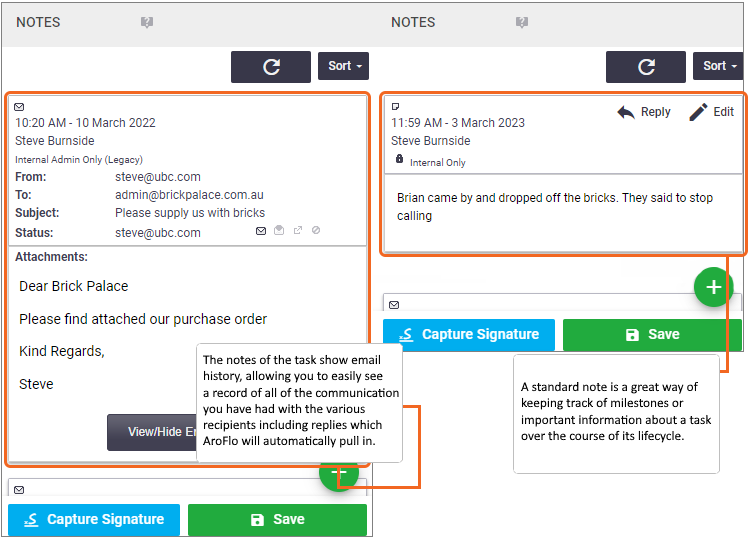
Keep track of communication history or leave notes to record important things that have been happening during the lifecycle of your jobs.
To add a Note:
Tap Add Note as Text, enter your note and then Save.
Items
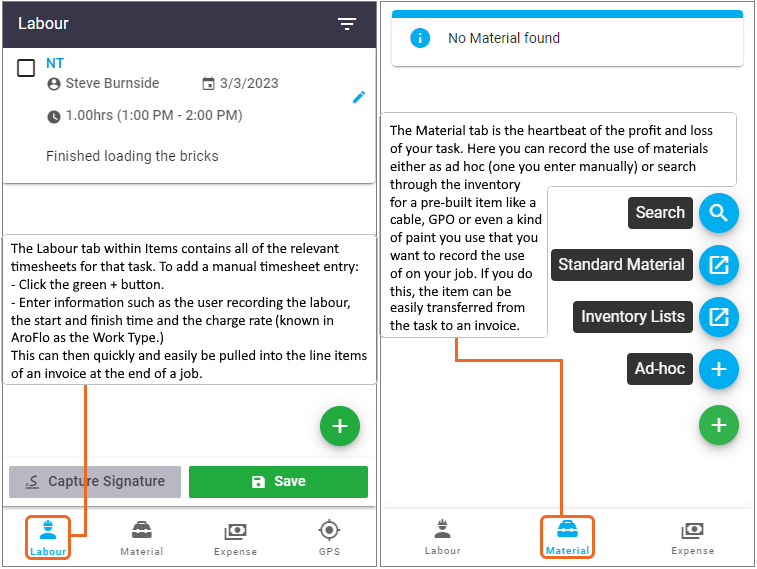
The Items tab represents the costs associated with your task.
The primary menus you'll be using are:
Labor Timesheets. Material Consumable goods you have bought, or used from your stock to work on the task. Expense Record miscellaneous costs such as parking fees or meals. While there is a lot you can do within these tabs this guide will focus on the core concepts of recording a timesheet and an ad hoc material item.
Timesheet
A timesheet is a visual representation of time spent working on a job by a particular person. At the beginning of this guide, you started a Timer to help you record a timesheet, but you can use the Labour screen if you would prefer to do this manually.
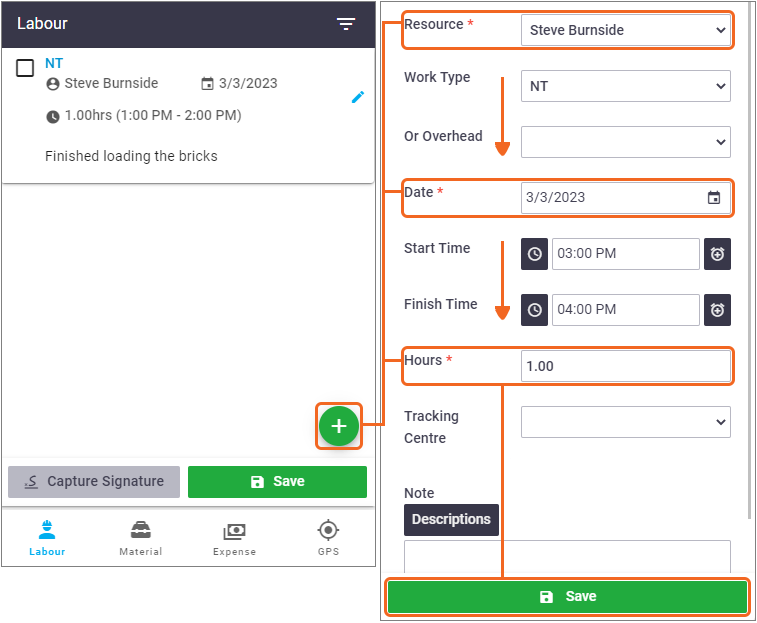
Click the green plus in the Labour tab, then select the Resource (or leave this if it is yourself), select the Work Type (the charge out rate), the start and finish times and then click Save.
After this, you'll be taken back to the labor screen so you can assess the timesheet you just entered.
If you make a mistake, tap the
 on an entry you want to change and modify the relevant information that appears. Then tap Save.
Material
Material used on a job can take many forms and can find its way onto an AroFlo task in a few different ways such as from your inventory or a purchase order.
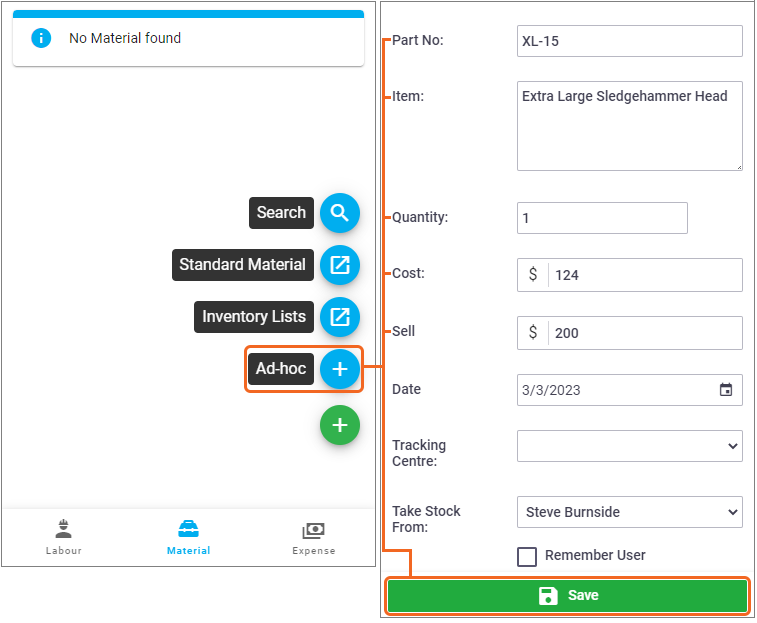
Assuming you just want to record a simple cost you need to attach to a task like a one-off purchase of a box of nails then just follow these instructions:
Tap the green plus in the Material tab, then tap Ad-hoc. From here, enter as much information as you can including part numbers if necessary, the quantity of the item used and the cost and sell. The reason you add cost and sell at this stage is that when it comes to invoicing you can pull this information directly into the line items of the invoice of the completed task which means less work for you later.
After entering all of the information you deem necessary for the item, click Save. The cost of the item has now been assigned to the task.
More
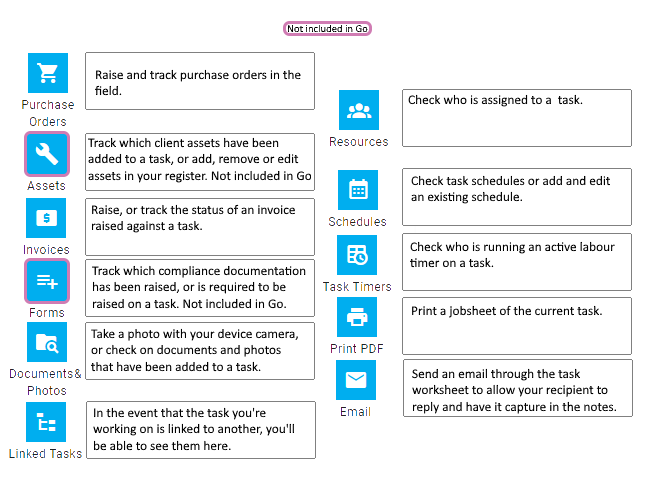
The More menu contains a set of additional actions you can take on a task to be able to capture or track more robust information about it.
AroConnect Forms
If a work order you received had forms attached by your client, the AroConnect logo will appear to distinguish them. Click the form to fill it out and complete it. You can learn more by reading Compliance Forms.
- After you have recorded all of the relevant information for your job using the relevant menu items, make sure to stop your labour timer by tapping it (
 ).
). - Enter your timesheet information for what you did on that task and tap Create Timesheet Entry.
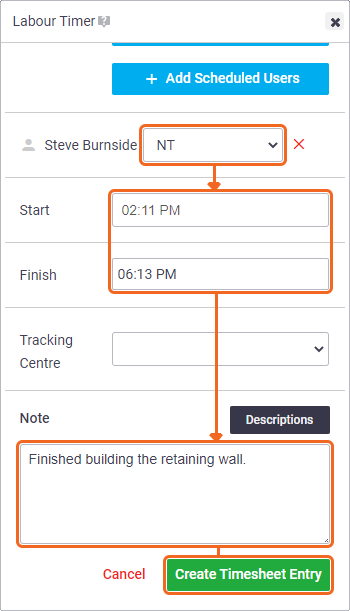
- If your job is complete, tap the Status button below the timer button and change the status to Completed and Save. If you need to go back later on to finish the job, set the status to Pending to remind yourself. Additionally, don't forget to reschedule it as necessary.
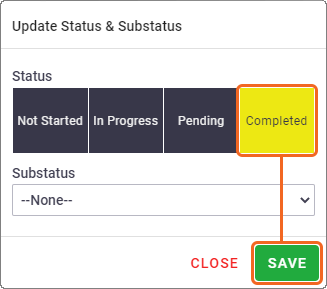
What Next?
After you've completed a job, you would invoice it. You can do this in Office, or Field.
See How Do I Work on a Task in Office? above for a guide on invoicing completed tasks using AroFlo Office.
See How Do I Send an Invoice through AroConnect below for a guide on invoicing through AroConnect.
Invoicing
How Do I Send an Invoice through AroConnect?
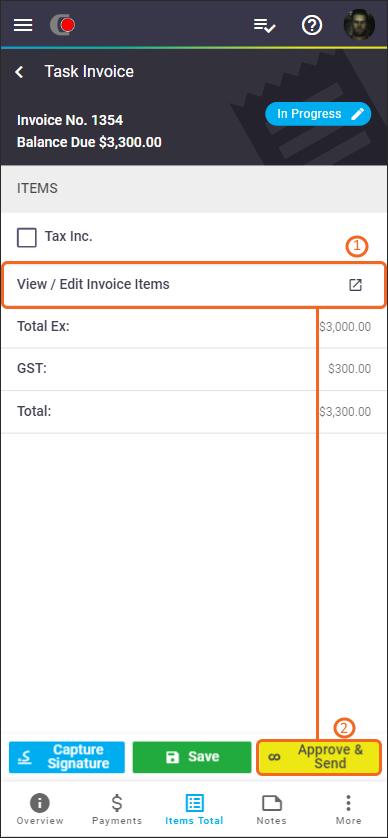
After completing a task in AroFlo Field that you received through AroConnect, you can quickly send your invoice back to your head contractor:
In Field
The client receives notification that a Bill has been received. From that point, you simply wait to be paid.
For information on more useful features available while using AroFlo to raise invoices in the Field, see Invoicing. |
 |
In Office
- Complete a task in AroFlo Office that you received through AroConnect.
- Click Create Final Invoice.
- Click Add All Work Order Items
If you want to add additional Task related costs such as unforeseen labour or expenses, click the Compare Jobsheet and Invoice Items tab. Then click Invoice All, then Save. 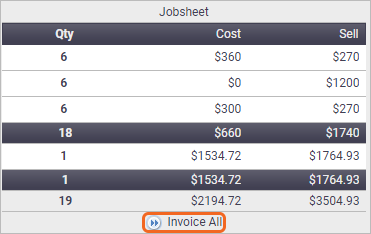
- Click Save to make sure you capture all of your changes.
- Once you're happy with the total click Approve & Send (
 ).
). - Click Send Invoice to finish the process.
The client receives notification that a Bill has been received. From that point, you simply wait to be paid.
For information on more useful features available while using AroFlo to raise invoices in the Office, see Invoicing.
 ) located next to the Save button.
 ) in the top left of the screen.