If you have a large organization with multiple business units that need to operate independently from one another, you can structure your AroFlo site to suit. We recommend reading Your Business Structure to determine whether multiple business units could benefit your business. You will also need to contact our Customer Service team first so they can assess your needs and give you the ability to create business units.

IMPORTANT
Please note:
- You cannot delete a business unit once you've created it. We can archive business units for you, but there may be a cost, we may need to take your site down for a few hours, and it's not always possible to bring all your data across from one business unit to another. We assess each request individually.
- Multiple business units can add complexity to the way you use AroFlo.
Before you begin
Because business units cannot be deleted except by AroFlo staff (with the caveats mentioned above), they should be created with care.
Plan your structure
| We recommend doing some planning before you create a new business unit, so that you know how many units you need and how you want them organized. You can reorder business units, but only within the same level of the hierarchy. | Example of structure
|
Example of structure
|
Consider your settings
Creating a new business unit allows a separate entity to operate within the same AroFlo subscription. When considering whether to add a new business unit, please note that the following items cannot be restricted by business unit and will display across both/all:
- Permission Groups
- Inventory categories (but not the inventory itself)
- Asset categories (including the assets themselves)
- Layouts for invoices, quotes, job sheets, purchase orders, bills
- Document Directory
- Compliance forms
- Description templates.
|
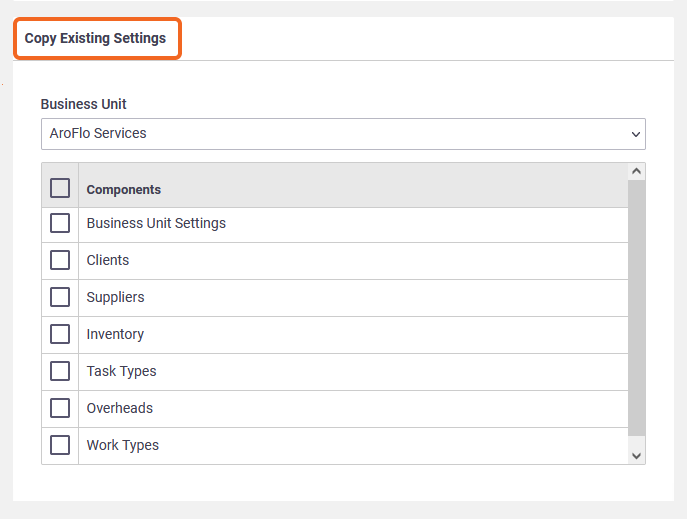
What about changes? In the same way that all of the above items are shared across all business units, changes made to any of these items in one business unit will be reflected in all others. Other settings can be copied from another business unit while you're creating your new business unit, saving set-up time. The option to copy existing settings is removed once you've saved your new business unit for the first time. If you want to use settings from another business unit, you must do this before you save. |
 |
 |
The settings that are available to be linked from your selected business unit to your new one are shown below.
Components
Click this checkbox to select all of the available components.
Business Unit Settings
Clicking this checkbox will copy all of the following settings from the selected business unit to your new business unit.
Settings
Clients
Ticking this box will link the selected business unit's clients to the new business unit.
No other client-related settings are copied to the new business unit, such as business-unit-specific client rates or markups, or event messages.
Suppliers
Ticking this box will link the selected business unit's suppliers to the new business unit.
No other supplier-related settings are copied to the new business unit.
Inventory
Ticking this box will link the selected business unit's inventory to the new business unit.
Tracking centres are not copied, but purchase and sales tax / account codes are.
Task Types
Ticking this box will link the selected business unit's task types to the new business unit.
It will not copy checklists, labour charges, defaults, calendar colours, linked compliance forms, etc.
Overheads
Ticking this box will link the selected business unit's overheads to the new business unit.
Work Types
Ticking this box will link the selected business unit's work types to the new business unit.
Add a business unit
If you've never added a business unit before, you will first need to contact our Customer Service team so they can assess your needs and give you the ability to do this.

To add a business unit:
- In Site Admin, go to Business Units.
- Locate the business unit you want to create a new business unit under.
- Click Add Business Unit.
- Complete the required fields as described in the table below.
Remember: If you want to use the Copy Existing Settings option, now is the time. See Consider your settings for details.
- Click Add Business Unit at the bottom of the screen.
Description of fields
Field/Setting |
Description |
|---|---|
| Company/Business Unit | Enter the name of the company or business unit. |
| Short Name | The short name is a prefix used as a reference number for internal tasks. AroFlo generates this for you but you can change it. |
| Auto generate task ref numbers | Leave this box checked. This setting will soon be removed. |
| Manager | Select an existing manager from the dropdown list. |
| Phone, Fax, Mobile, Email address, Alternative email address |
Enter contact details relating to the business unit. An email address is required. |
| Website | Used to record a company website URL. |
| Address, City, State, Postcode, Country | Select an existing address from the dropdown list or enter a new address in the fields below. |
Access between business units
With multiple business units set up, you'll need to navigate through them and decide what access (if any) staff should have to each one.
Switching between business units
You can see which business unit you are in by looking at the top left of your screen, where you'll see the business unit name. To switch to a different unit:
- Click the down arrow beside the business unit name.
- Click the name of the unit you want to switch to.

While in the Business Units set-up area, you can also click on the relevant link in the Business Unit column to switch to another unit.
Access settings
The checkboxes in the Business Units set-up area control access between the business units.
The business unit you are in will not have any checkboxes available for selection.
You need to set the options you want for each business unit. Our image shows the settings for AroFlo Services. We can switch to each of the business units in turn and set them up as needed. Some examples are shown below.
Plumbing Division
We want staff in the Plumbing Division to have full access to the AroFlo Services parent business unit, but not to the other child business units. We would set this up like this:

Electrical Division
The Electrical Division has some crossover with the HVAC Division, so staff in the Electrical Division have access to all aspects of the HVAC Division and to the AroFlo Services parent business unit. Here's the setup:

HVAC Division
The HVAC Division has some crossover with the Electrical Division, so staff in the HVAC Division have access to all aspects of the Electrical Division and to the AroFlo Services parent business unit.

AVCEE Services
The AVCEE Services staff need access to all other divisions, including the AroFlo Services parent business unit.

These settings are explained below, using the setup shown in our main image as an example.
When you're in AroFlo, you can hover over the  (question mark) icons for a handy reminder of what each setting does.
Users Access
Allows users to switch to and access the selected business unit.
Example
In the main image in this section (above), an AroFlo Services user can switch to any other business unit and work within it.
In the following image, an AroFlo Services user would only have access to the AroFlo Services and the AVCEE Services business units, as shown by the dropdown menu in the top left of the image.
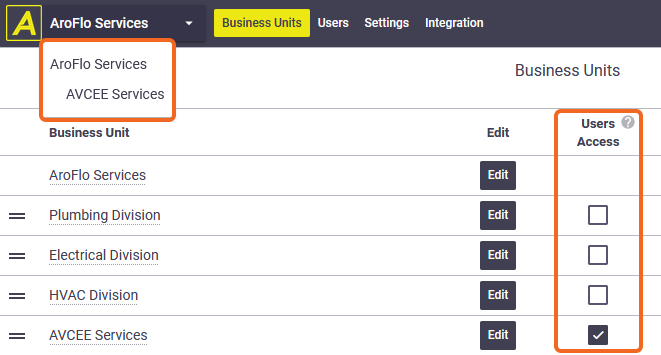
| To switch between business units, click the down arrow beside your company name in the top left of the screen, then click the name of the business unit you want to access. |  |
 |
Users Task Labor
Allows a user to select resources from another business unit when recording labor on a task owned by their own business unit.
Example
When an AroFlo Services user is recording labor on a task owned by the AroFlo Services business unit, they will be able to select a user (i.e. resource) from any other business unit and record labor for them on that task.
| To view resources from another business unit that you have access to, in the Labor Worksheet's Resource dropdown, click All Resources. The additional resources will appear and you can make your selection. |  |
 |
Users Task Assign
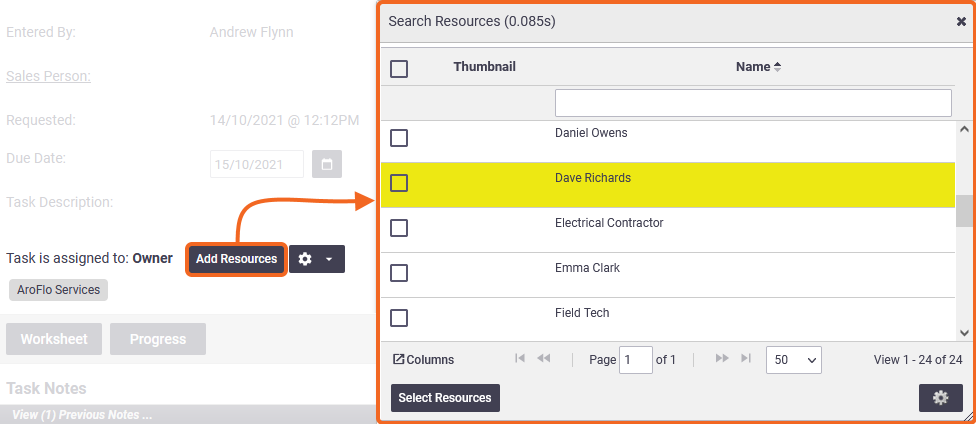
Allows users in one business unit to assign tasks owned by that business unit directly to a resource in another business unit. Otherwise, tasks can only be assigned to the other business unit as a whole.
Example
When an AroFlo Services user opens a task and clicks Add Resources, they will be able to select a resource from any other business unit and assign the task to them.
Users Schedule
Allows users in one business unit to schedule a task in that business unit to a resource in another business unit.
Example
| Within a task, when an AroFlo Services user clicks Add Resources to Schedule > Add Users, they will be able to select a resource from any other business unit and schedule the task to them. | 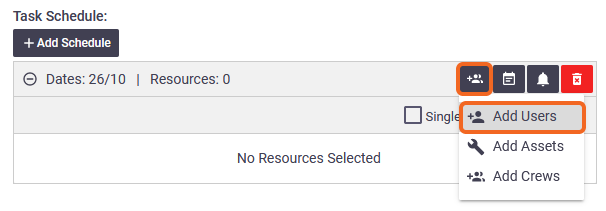 |
 |
Business Units Task Assign
Allows tasks to be assigned to another business unit.
Example
| When an AroFlo Services user opens a task and clicks Add Resources, they will be able to select any other business unit and assign the task to it. | 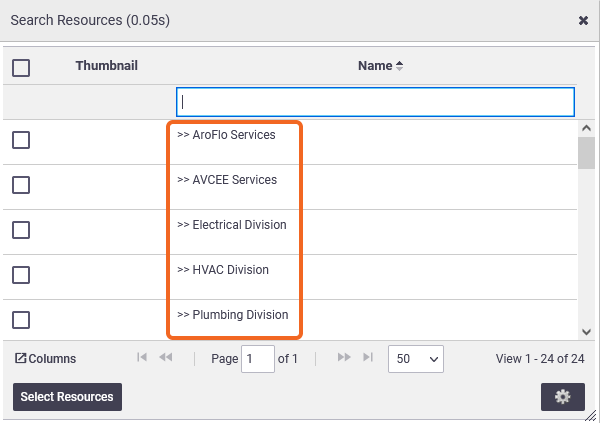 |
 |
Reordering business units
To change the order in which business units appear in the Job Control table on your AroFlo home page:
- Go to Site Administration. The list of Business Units appears.
- Click and drag the
 (two bars icon) to move the Business Unit up or down the list.
 - Drop the Business Unit onto your preferred location.
- Save.
The Business Units listed in your Workflow Totals on your Home Dashboard should now appear in the order you've set them to.
Moving groups
|
 |
 |
Edit business unit details
You can edit business unit settings to change company name, address and contact details or add a logo to the site and payment options used on invoice layouts.

- Go to Site Administration > Business Units.
- Click Edit.
- Make changes as required. Refer to the table below for descriptions of additional fields and settings.
- Save.
Description of fields
Field/Setting |
Description |
|---|---|
| Logo | This field allows you to upload your company logo to have it appear on the print view of layouts. To upload your company logo, use the Browse button to locate the logo on your local PC. Business unit logos have the following requirements:
Logos appear at their actual size on layouts. |
| Icon |
This field allows you to upload your company icon to have it appear on your AroFlo site's header. To upload your company icon, use the Browse button to locate the icon on your local PC. Business unit icons have the following requirements:
|
| Sending Domain Prefix |
Used to configure the email address for sending emails from AroFlo, e.g YourCompany@notifications.aroflo.com Refer to our Email Configuration help page for more information. |
| Payment Options | Enter the payment information that you would like to include in invoice layouts. |
| Time Zone | Select the time zone that applies to this business unit. |
Archive Business Unit
Remember that business units cannot be deleted from AroFlo. If you need a business unit archived and removed from your AroFlo site, please submit a support request via the AroFlo help menu.
