AroFlo allows for your clients' work order email requests to be automatically imported into your AroFlo site. On import, a client work order automatically creates a task. You can also set it up to automatically alert your client that a task has been created in response to their work order.
Import Website Enquiries
You can use this functionality to automatically create tasks from website enquiries. See our Website Enquiry Imports page to learn more.
Setting up work order email imports is something we normally do for our clients, as it can be quite complex. You are entitled to free work order import setups as part of your initial site set-up, even if you're a Go client. See Import Work Orders if you want us to set up your work order imports for you.
The instructions below are for those who wish to set up their own work order imports.
There are three main steps involved in setting up work order imports:
- Configure the email and import settings in AroFlo.
- Import the work order content.
- Map the fields on the work order to the Task fields in AroFlo.
The sections below explain these steps in detail.
- Work orders must be one of the following file types: PDF, RTF, HTML, TXT, XML and CSV or part of the email body.
- AroFlo cannot read PDF files that have been generated from a scanned document. The way to tell if the PDF is suitable for AroFlo is to try and select the text. If you can, you're fine. If you can't, the document is an image and you won't be able to convert it to text or import it automatically into AroFlo.
1. Configure
Configure the email and import settings
To configure the email and import settings:
- Select Accounts > Clients.
- Select the client who will be sending you the work order.
For Website Enquiries
You may want to set up a dummy client for website enquiries. As enquiries come in, AroFlo will create tasks against that client. You can sort through those tasks to determine which are leads, which are from existing clients, and which are spam. Simply change the client name on the task to start working with that client. See Website Enquiry Imports.
- Click Email Import to Create Task.
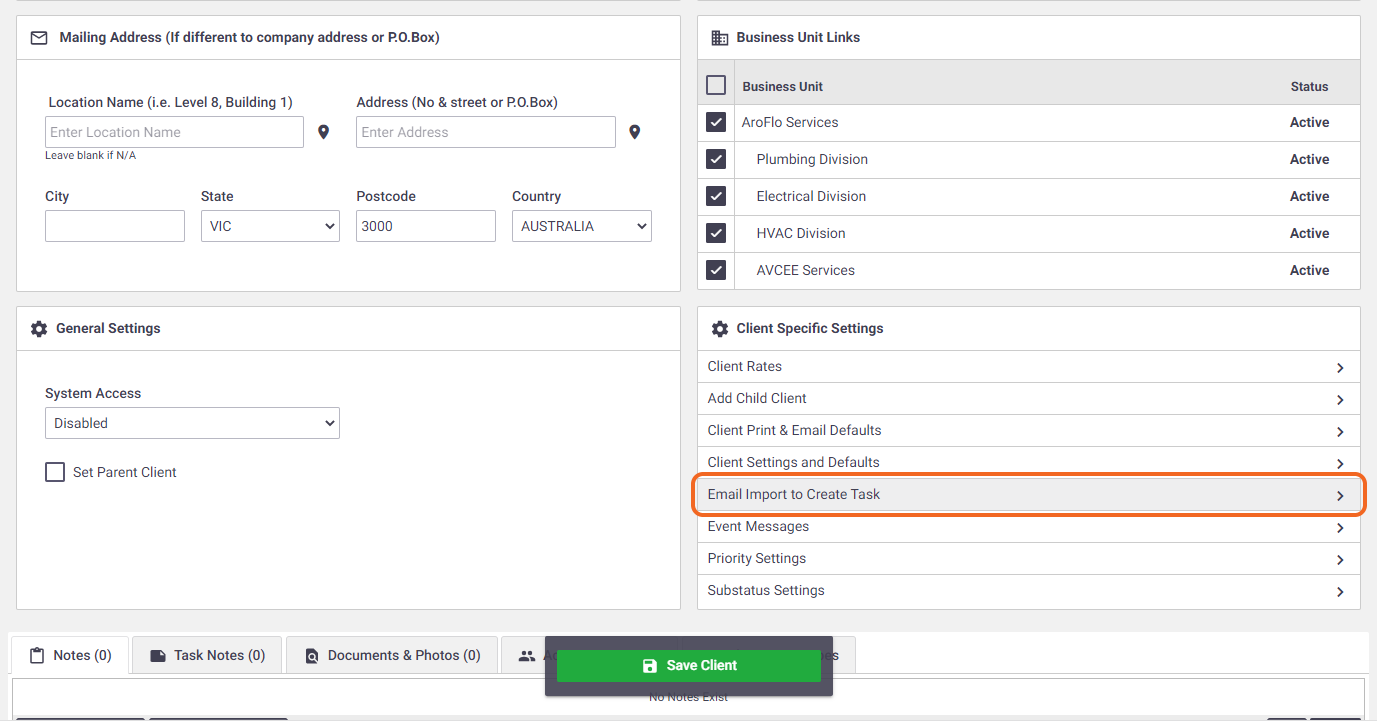
- Go to Configure Email and Import Settings and follow the instructions there.
2. Import
Import the work order content
As soon as you've saved your configuration settings, the Scan, View and Setup window displays on the right-hand side. This is where you'll select the items you want to map. To get the work order content into this window, follow the steps below.
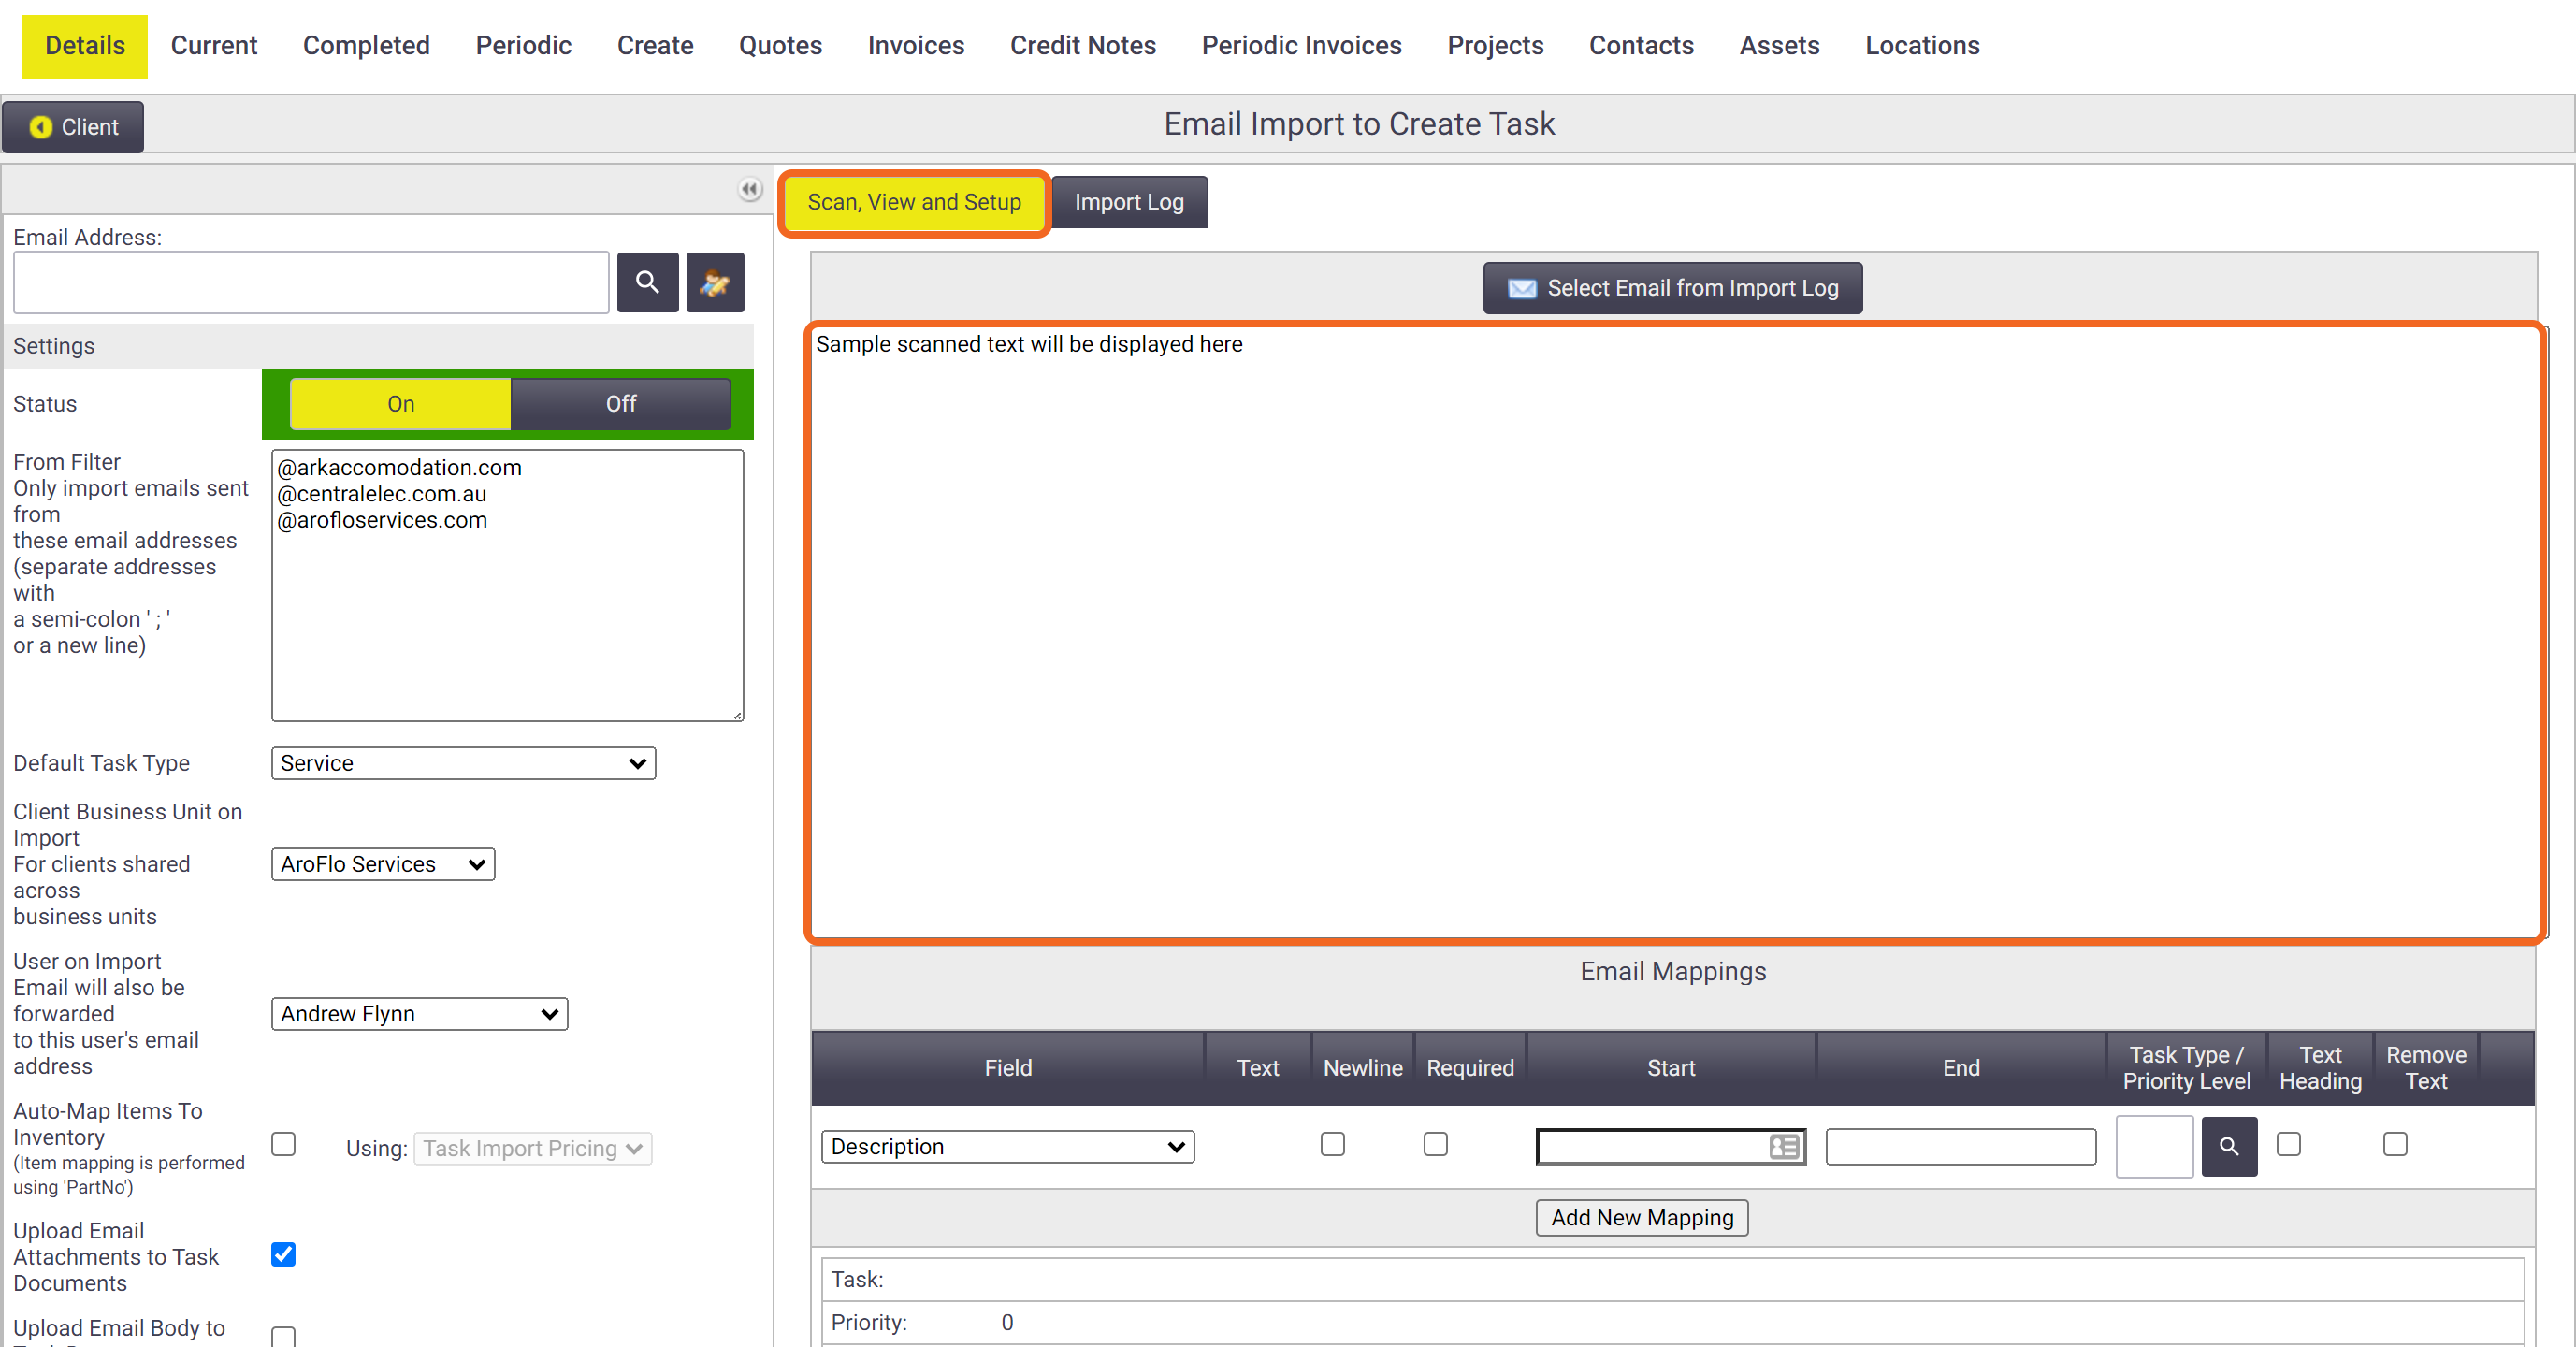
- Send an email, either from within AroFlo or from your normal email account, to the email address you just created (i.e. the one ending in @imports.aroflo.com). In the above example, you would send it to aroflo_client_wo@imports.aroflo.com and include a PDF work order attachment.
Remember to include your email's sending domain in the From Filter, as described in Configure Import Settings.
- Click Select Email from Import Log and select the email you want to import. You will have the choice of the last 15 emails received.
If the email hasn't arrived after a few minutes, check that you've got the import 'Status' turned on.

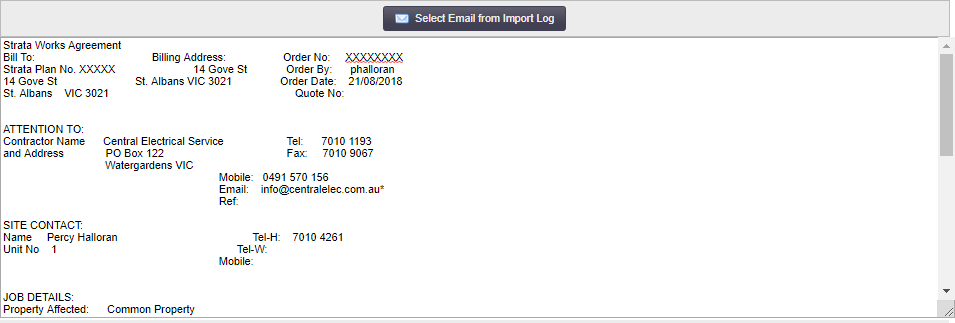
- The content of the email attachment will appear in the Scan, View and Setup field.
3. Map
Map the fields
Once you have your content in the Scan, View and Setup window, you're ready to start mapping the fields in your work order to the ones AroFlo needs to create a task.
- Select a field to map using the Field dropdown. In the example below, we've chosen the CustOn (Customer Order Number) field.
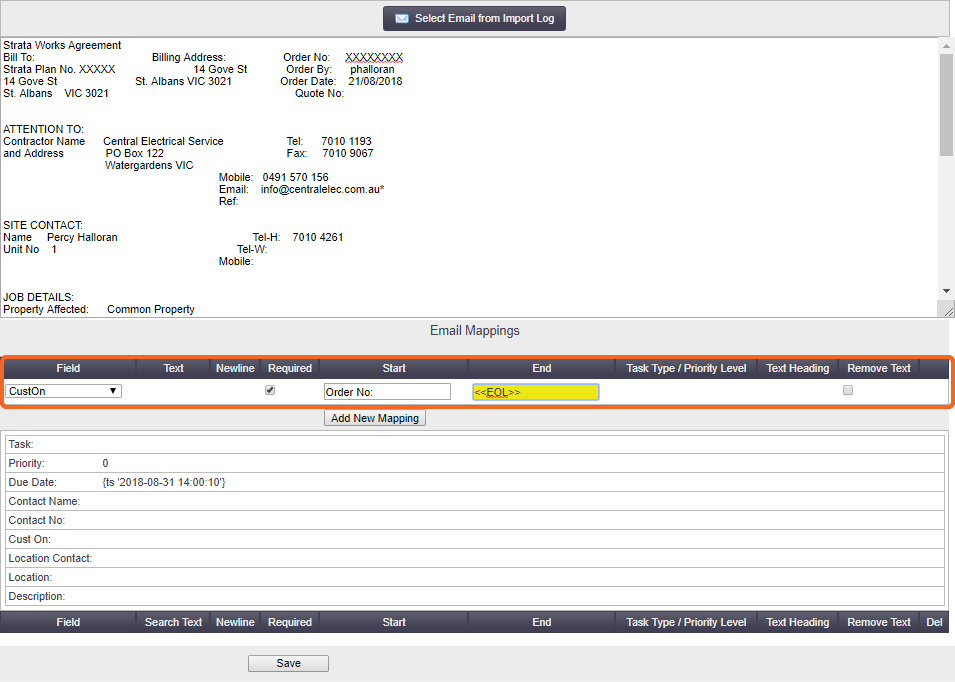
- Complete the fields as shown in the expandable table below these instructions.
- Click Add New Mapping. The mapping you just did will appear at the bottom of the screen and you can edit it if you need to.
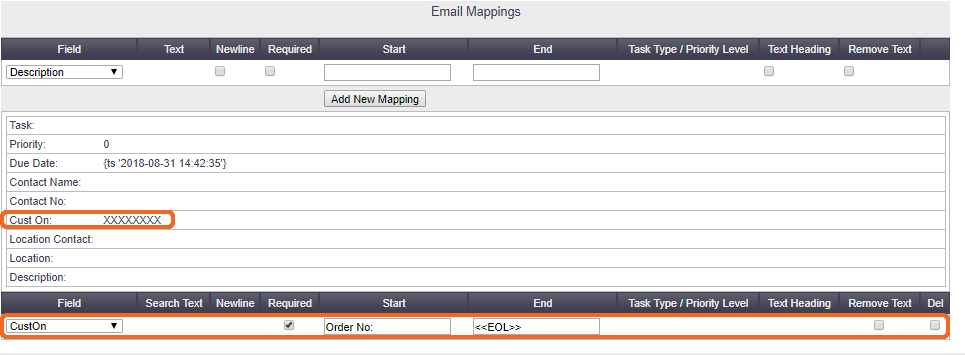
- Repeat Steps 1 to 3 until you've mapped all the fields you need.
You don't have to map all the fields on your clients' work orders - only the ones that are needed to create tasks in AroFlo. Any fields you don't map will simply be ignored.
Note: you can't map custom fields.
Click here to see field options
Column header |
What it does |
||||||||||
|---|---|---|---|---|---|---|---|---|---|---|---|
| Field | Select a field name to map. | ||||||||||
| Text | This option only appears when the Task Type, Priority, Sales Person or Business Unit fields are chosen in the Field column. It can be accompanied by the Start / End fields, or the Task Type / Priority Level dropdown menu. It allows you to tell AroFlo what action to take if a certain word or phrase is found in the work order text. ExampleIn this example, we've told AroFlo that when it finds the word 'Install' in a work order, the task it creates should have the Task Type 'Installation'.  This field also appears when you choose 'Remove' in the Field column. In this case, the text you enter into the Text box is what AroFlo will remove from the work order content you imported into the Scan, View and Setup window. |
||||||||||
| Newline | This option only appears when mapping the Description field. Checking this box allows you to add content to a description you've already mapped and adds a line break so the new content appears on a new line. ExampleIn the example below, we want to create a 'Description' out of two pieces of information: Job Details, and Notes, but there's a problem - we have 'Invoice to' in between those two fields. 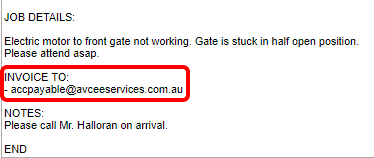 So we complete the fields as shown below and click Add New Mapping. This will pick up the content starting with 'Electric motor...' and ending with '...asap'.  The preview shows what the Description looks like so far: 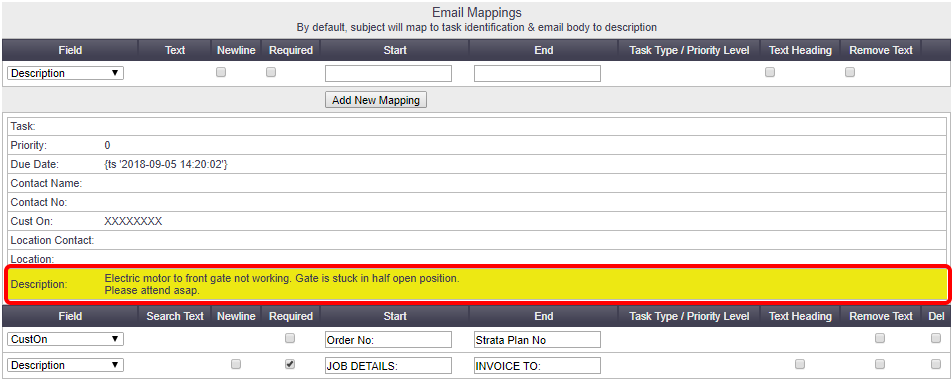 To complete the description, we want to go back and pick up that note. So we again select Description from the Field dropdown, and this time we click 'Newline'. We choose NOTES: as the Start and END as the End.  This has added a new line to the description.  |
||||||||||
| Required |
Check this box to tell AroFlo that the field you're mapping is a required field. AroFlo will display an error if a required field is not found in an imported work order. CustON (Customer Order Number) is commonly marked as a required field, as is contact name and number. |
||||||||||
| Start and End | To show AroFlo which data element you want to map against a field, you need to select an element either side of the one you want (i.e. select the 'start' and 'end' elements). ExampleIn the example below, we're telling AroFlo to map the data between 'Order No:' and 'Strata Plan No' against the CustOn field. The data inside the blue box is what will appear in the CustOn field of imported work orders. 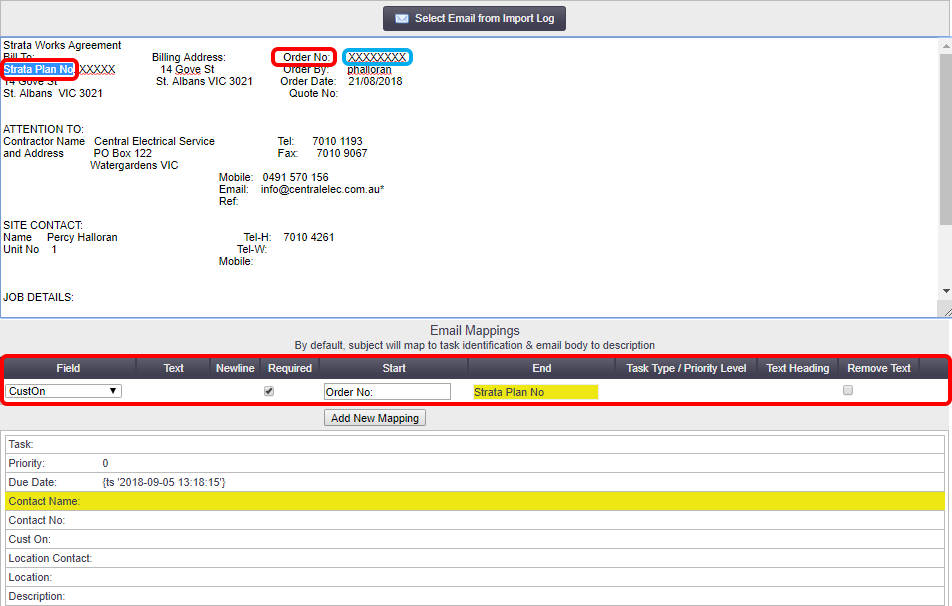 To automatically complete the Start and End fields: - click into the field you want to complete - in the work order content area, select the text you want. If you prefer, you can type in these fields, but make sure you type content exactly as it appears in the work order text. If the data element you're selecting sits at the end of a line, you can use the tag <<EOL>> (end of line) in the End field. If it sits at the end of the entire work order content area, you can use the tag <<EOF>> (end of file) in the End field. |
||||||||||
| Task Type / Priority Level | This field is only available for four field names and gives you different options depending on which one you've chosen.
|
||||||||||
| Text Heading | This field is only available when mapping the Description field. It sets all the selected text to bold. | ||||||||||
| Remove Text | This checkbox is available for most field types. It allows for the situation in which there are multiple instances of a word or phrase that you need to use as a Start or End term, for example, 'Name' or 'Address'. Before you view the example, please keep in mind that when you ask AroFlo to map a field, it will: - search the entire work order content window every time - search from top to bottom, left to right - respond to the first instance of your 'Start' term that it finds.
For these reasons, it can be helpful to remove some of the content once you've mapped it, so that it doesn't interfere with mapping other fields. ExampleSuppose you want to map the Contact Name field. In the work order content, under SITE CONTACT, we can see 'Name Percy Halloran'.  So you would think that the way to map this would be as follows:  However, the work order content has an earlier instance of the word 'Name', so AroFlo has picked up everything between that first instance and 'Tel-H:' (see the text in bold in the content area, and shaded in grey in the preview area). The instance of 'Name' marked in blue is what we really wanted to start from. 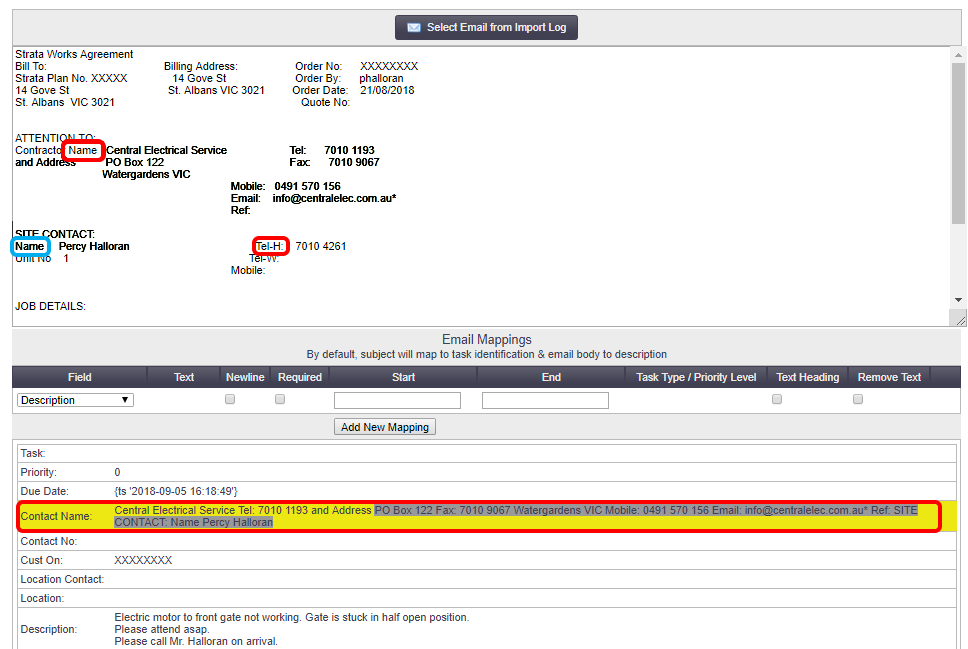 To avoid this problem, you could either: - pick up more text when copying 'Name' into the Start field, e.g. select SITE CONTACT: Name, so that this instance is different from the earlier instance, or - when mapping the earlier instance, check the 'Remove Text' box so that the earlier instance is removed from the work order content once it's been mapped. |
4. Confirm Fields
Confirm fields you can map
|
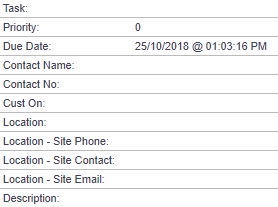
The fields displayed in the image to the right are the ones that appear by default when you start mapping a work order import. This list roughly corresponds with the options available in the Field dropdown menu. These are explained in the expandable table below. |
 |
 |
Click here to see the field types you can import
Field name |
How to use it |
|||
|---|---|---|---|---|
| Description |
Complete the Start and End fields to describe the work that's required. Note: this field can be used more than once in the same mapping. See the example in the Newline row of the table above. |
|||
| Task | Complete the Start and End fields to select some text to use as the Task Identifier. | |||
| Task Type | Enter a term in the Text field and select a task type from the Task Type / Priority Level drop-down menu. AroFlo will check all work order imports and if it finds your nominated text, it will create a task with your chosen task type. Example: the text 'Service' creates a task with the task type 'Service & Maintenance'. | |||
| Due Date |
The due date in the preview will default to the current date. You can override this by completing the Start and End fields to define a due date from the work order content. ** Please note the best due date format is dd/mm/yyyy or dd-mm-yyyy (Australian format)** |
|||
| Priority |
You have two options here. Either:
|
|||
| CustOn | Complete the Start and End fields to define the customer order number. | |||
| Sales Person | Enter a term in the Text field. In the Task Type / Priority Level field, click the |
Field name |
How to use it |
|---|---|
| Contact Name |
Complete the Start and End fields to define the contact name. Note: 'Name' is commonly repeated in work orders. See the Remove Text row of the table above for how to avoid problems with duplicate field names. |
| Contact Phone | Complete the Start and End fields to define the contact phone number. |
| Location | Complete the Start and End fields to define the task location. This field can be used more than once in the same mapping. |
| Location - Site Phone | Complete the Start and End fields to define the location phone number. |
| Location - Site Contact | Complete the Start and End fields to define the location contact name. |
| Location - Site Email | Complete the Start and End fields to define the location email address. |
| Business Unit | Enter a term in the Text field and select a task type from the Task Type / Priority Level drop-down menu. AroFlo will check all work order imports and if it finds your nominated text, it will create a task with your chosen task type. Example: the text 'Plumbing' creates a task in your Plumbing Business Unit. |
| Note 1,2,3 | Complete the Start and End fields to define up to three notes. |
| Remove | Allows you to remove duplicated text so that it doesn't interfere with mapping. See the example in the Remove Text row of the table above. |
| Materials | There are five materials options that have been set up for some specific AroFlo clients who receive work orders containing lists of materials. If you need more information about this, please contact our Customer Support staff. |
5. Alert
Alert your client
Once you've set your work order imports up, you can set set up a client-specific event message. Refer to Event Messages for instructions.
 (magnifier) to make a selection from the Search Sales Person window.
 (magnifier). AroFlo will check all work order imports for your nominated text and will assign the new task to the Sales Person you've selected. Example: In the Text field, enter the name of a client, suburb, or state and select the Sales Person who handles that client or area.