|
Use the instructions below to export a list of your clients and suppliers. These can then be uploaded into AroFlo using the bulk import tool. Do not include credit card details Please ensure that you do not include client credit card details when exporting from your application. You can either deselect these columns when exporting, or open the file and delete the columns after exporting. |
 |
 |
Export clients and suppliers from your system
If you would like to manually export, clean up, and then import data from your accounting package, you can use the following tabs to assist with the export instructions:
Get Started:
 Select the application with your clients and suppliers
Xero
|
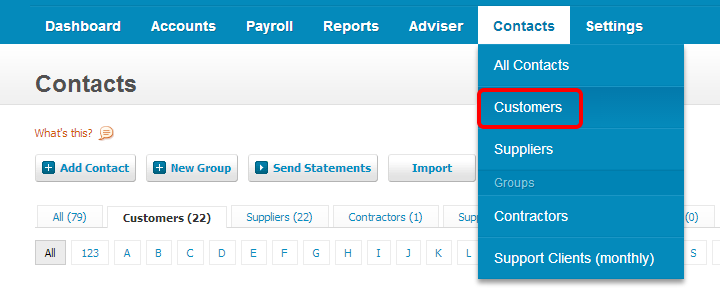
Click here to see the Xero support page for instructions To export customer contacts from Xero, refer to the Xero instructions above. Please note the steps below.
|
 |
 |
Identify your contacts as 'Client' or ‘Supplier’
If you have exported all of your contacts to one file, you will need to add a column called 'Client/Supplier' and use it to identify each contact as either a Client or a Supplier. This will ensure that we import your contacts correctly into AroFlo; if no distinction is made, all your contacts will be imported as Clients.
MYOB AccountRight
|
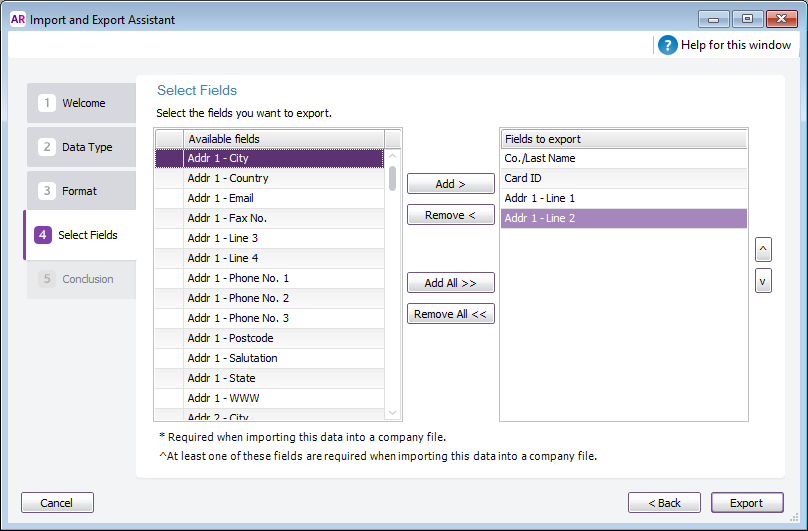
Click here to see the MYOB support page for full instructions Be sure to also:
|
 |
 |
Format data
The TXT file type that MYOB gives you by default will need to be formatted into usable, delimited data and saved as a CSV file for upload into AroFlo.
If you have data that you don't want to import (e.g. if you've used the address field to record notes about a client), please contact Customer Service.
Looking for MYOB Essentials?
MYOB Essentials does not allow exporting of contacts. Please contact Customer Service for assistance.
Reckon Accounts or Hosted
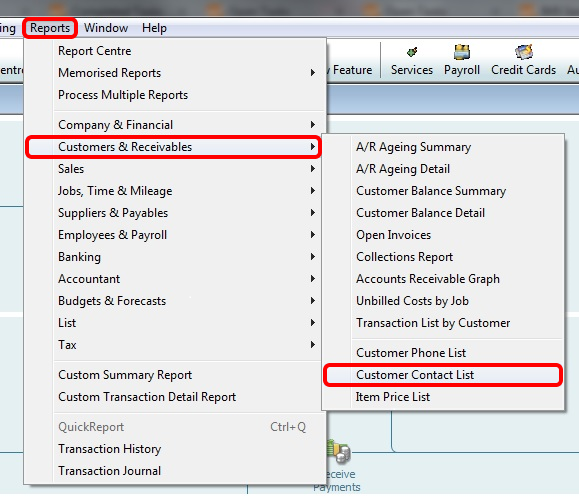
To export all customer contacts from Reckon Accounts or Reckon Hosted, follow these steps:
- In the top menu, click Reports > Customers & Receivables > Customer Contact List.
- Click Modify Report.
- Select ALL options.
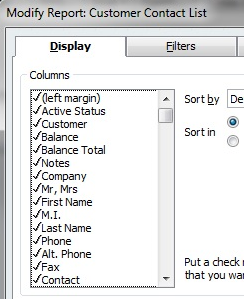
A quick way to select all options is to hold the down arrow and the space bar on your keyboard until all unchecked items are checked.
- Click OK.
- Click Hide Header > Export.
- If you have Microsoft Excel installed, click a new Excel workbook. If you don't have Excel, click a comma separated values (.csv) file.
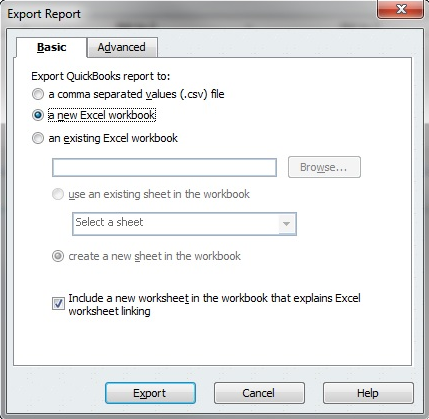
- Click Export. Excel, or a text editor, opens and displays the report.
- Save the file in a location that you will remember.
Repeat this process to export your suppliers list, but in Step 1, select Suppliers & Payables.
Other applications
Export data from another source
If you need to export client and supplier data from another source, export your data as a .CSV or .XLS file from that application.
Use our templates
You can use our templates to prepare your data for uploading via AroFlo's bulk import tool.
If your data is complex, use our import templates and send it to us.
We recommend that you only include active clients and suppliers. This will ensure users have current client and supplier information from the start.
What information do I need to export?
The client and supplier fields listed below can be imported into AroFlo.
- Any headings in your file do not have to match the field name we have in AroFlo. (E.g. Your file may have 'given name' and AroFlo has 'first name')
- If a field you require is not shown, you can add custom fields in AroFlo before starting your import.
AroFlo comes with a pre-built Training Client and Training Supplier so you can see a completed client or supplier card for reference.
Field |
Definition |
|---|---|
| Client / Supplier Name | Company/Business name. *Required field |
| Primary Contact First Name | First name of your contact person at that business. *Required field |
| Primary Contact Last Name | Last name of your contact person at that business. *Required field |
| EIN | Client's Employee Identification Number |
| Client Note | A generic message which appears on the client card e.g. ‘Ensure invoices are sent to accounts’ |
| Client Short Name | Short name for client (max. 6 characters) |
| Primary contact person's email address | |
| Fax | Client's primary fax number |
| Mobile (cell) Phone | Primary contact person's cell phone number |
| Parent Client | Name of the Parent Client (if applicable) n.b. this client will be added as a Child Client |
| Phone | Primary contact person's phone number |
| Terms Note | Information relating to client's trading terms |
| Transaction Terms | Transaction terms for this client as per Site Admin (e.g. 30 Days) Import values Check how AroFlo formats this data by going to Create > Client. Check the 'Terms' drop-down menu to see the options available. |
| Website | Client's primary website |
| City | Client's location suburb |
| Company Address | Client's location street address (No. and street) |
| Company Location Name | Client's location name (e.g. Level 8 Building 1) |
| Country | Client's location country |
| Zip Code | Client's location zip code |
| State | Client's location state |
| GPS - Latitude | GPS Coordinates - Latitude |
| GPS - Longitude | GPS Coordinates - Longitude |
| Is Individual? | A checkbox to specify if your client is an individual (e.g. domestic work for a home owner) Import values The Individual field can have the values '1', 'yes', 'y', 't', 'true', 'on', 'checked', 'filled', or 'individual'. |
| Mailing Address | Client's mailing street address (No. and street or PO Box) |
| Mailing City | Client's mailing suburb |
| Mailing Country | Client's mailing country |
| Mailing Location Name | Client's mailing location name (e.g. Level 8 Building 1) |
| Mailing Zip Code | Client's mailing zip code |
| Mailing State | Client's mailing state |
What's next?
Once you have your file, simply log into AroFlo and step through the Getting Started Assistant, or follow the instructions here. Alternatively, you can also send the file to us.