| Footers are slightly different from normal layout elements in that they can be saved independently from your main layouts, and can be re-used in other layouts without needing to be recreated for each one. | 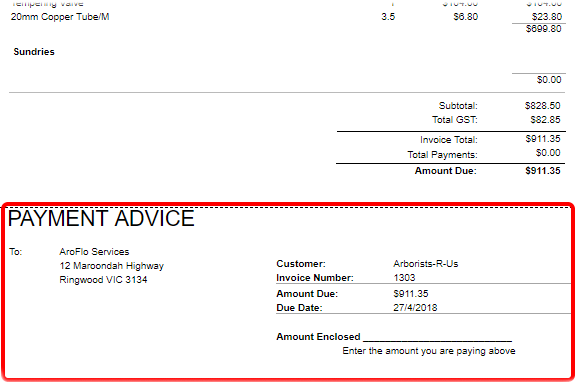 |
|
Add a default footer
To add one of AroFlo's default footers to a layout, make sure you've saved a copy of the layout as described in Custom Layouts.

- Edit the custom layout you want to add a footer to
- From the Design tab, click Footer
- A Layout Footer element will appear in the top left corner of your layout. Click and drag it to where you want it to appear on the layout
- Click the footer element to edit it
- Click Setup.
- In the Footers Setup window, use the dropdown for the Footer Available field and select the footer you need
The list contains default footers as well as footers you've already created.
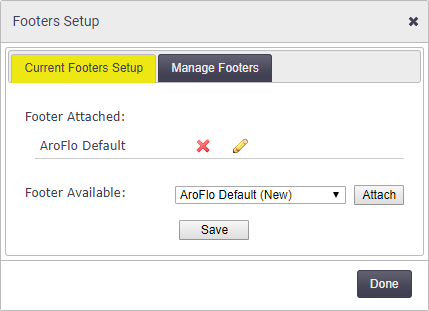
- Click Attach > Save > Done.
- Save your layout
- To preview your footer, click Preview or use
 (multi-window icon) to open a pop-out window.
You can also select footers from our Sample Layout Footers page. For instructions on using these footers, see Use a sample layout footer, below.
Edit a footer
To edit a footer, make sure you've saved a copy of the layout as described in Custom Layouts.
- Edit the relevant custom layout
- Click the footer to edit it and click Setup
- In the Footers Setup window, take note of which footer is currently attached.

- Click the Manage Footers tab.
- Use the dropdown to select the footer you need to edit and click Edit.
Footers displayed in italics are default footers. Footer names not in italics are ones that have been saved.

- In the window of the HTML editor, make any changes you need to.
- Save your footer:
- If working with a default footer, give your footer a name and then Save Footer As > OK
- If working with an existing footer, simply Save Footer
- Click Done to close the Footers Setup window
-
Save your layout and Preview to view the changes to your footer or use (multi-window icon) to open a pop-out window.
Add a custom footer
To set up a whole new footer, or to use one of our sample layout footers, make sure you've saved a copy of the layout as described in Custom Layouts.
- On the layout you want to create a footer for, click Edit to open the layout editor.
- Click the footer to open the edit footer window.
If there is no footer present, and you can't see the [Layout Footer] element, add a footer from the Design tab. See Add a default footer, above.
- In the edit footer window, click Setup > Manage Footers.
- Click New.
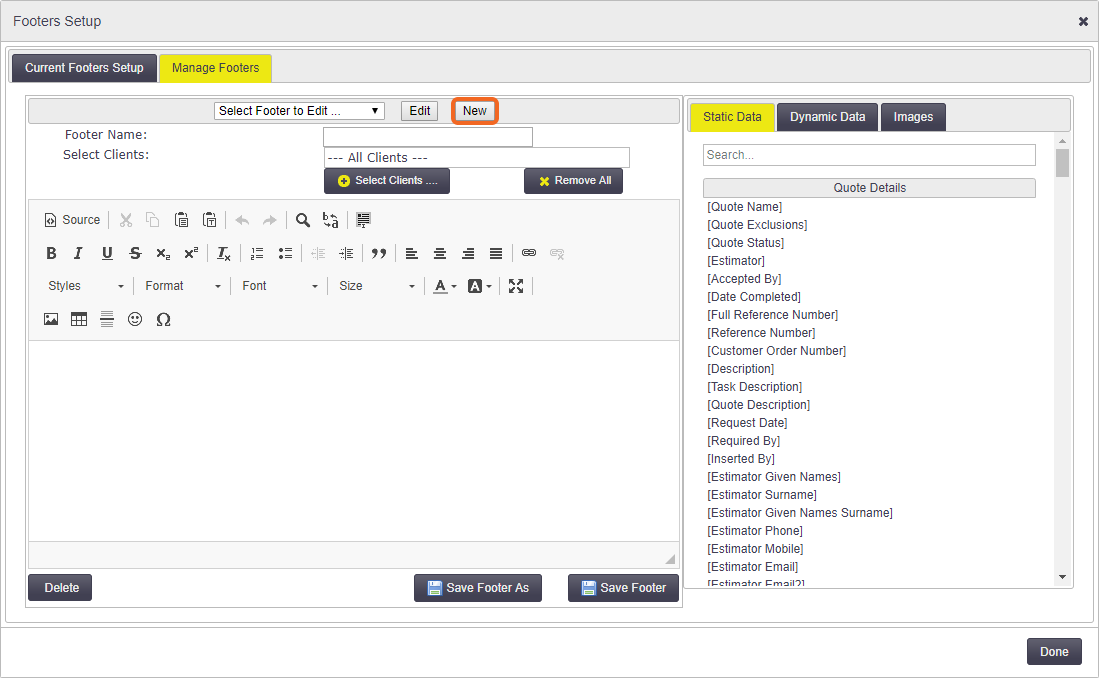
- Enter a name in the Footer Name field.
You can decide which clients you want to use a particular footer for by clicking Select Clients.
- Click into the HTML editor field and start creating your footer. From here, there are two ways forward:
- manually create your footer using the formatting options and selecting items from the Static Data, Dynamic Data and Images tabs on the right.
- copy the HTML of one of our sample layout footers and paste it into the HTML source pane.
Create a footer manually
We recommend inserting a table so you can easily align your elements.
- From the window to the right of the HTML editor field, select the elements you want to include in your footer. You can choose from:
- static data elements, such as names, invoice numbers and dates (i.e. values that don't change)
- dynamic data elements, such as balances and totals (i.e. calculated values)
- images from your Document Directory.
If you know the name of the field you need, enter it into the search bar at the top of the list of fields.
- Make any formatting changes you need to, such as font size, alignment, and insertion of bullets or numbers.
- Click Save Footer > Done.
- To apply the footer to your layout, click Setup again.
- In the Current Footers Setup tab, select your new footer from the dropdown.
- Click Attach > Save > Done.
-
Save your layout, or use the
 to save a copy of your layout.
 -
Preview to view the changes to your footer or use (multi-window icon) to open a pop-out window.
Use a sample layout footer
The Sample Layout Footers page contains a list of alternative layouts. To use one of these layouts:
- Click Source (top left of the HTML editor).
- Go to the Sample Layout Footers page and select the footer you want to use.
- Click Expand source (far right of your chosen footer).
- Copy all the HTML code.
- Paste the HTML code into the Source field of the Footers Setup window.
- Click Save Footer > Done.
-
Save your layout, or use the to save a copy of your layout and give it a new name.
-
Preview to view the changes to your footer or use (multi-window icon) to open a pop-out window.
Delete a footer
If your list of available footers has become cluttered, you can easily delete the footers you no longer need.
- On the layout you want to amend, click Edit to open the layout editor.
- Click the footer to open the edit footer window.
- In the edit footer window, click Setup > Manage Footers.
- Use the dropdown to select the footer you want to delete.
- Click Edit > Delete > Done.
If the footer you've chosen to delete is currently in use on any of your layouts, you will receive a message saying Footer is currently linked to a layout. Remove the link and try again. Click OK > Done then click Setup again.
On the Current Footers Setup tab, click the red X beside the name of the footer in the Footer Attached field, then click Save > Done. Repeat steps 3 to 5.
Pagination
|
The AroFlo layout editor treats your layout as if it were one long piece of paper. This means that it can't judge where each page ends and a new one begins. You can offset this to some degree by ensuring the Show on each page option is ticked, in the footer properties. This will insert the footer at the base of each page. |
 |
|
If your documents often need to run to more than one page, there are a couple of solutions that may work for you:
- Create multiple layouts:
- one that is strictly formatted (i.e. where the elements are locked to their positions on the page), to use for single-page documents
- one that is more loosely formatted (i.e. where the elements are not locked to a position on the page), to allow line items to run onto a new page.
Each layout element can be locked in place by clicking it and then clicking the Lock Element option in the element's Properties window. 
- Create an RTF layout.
For help with setting up multi-page layouts, please submit a support request.