|
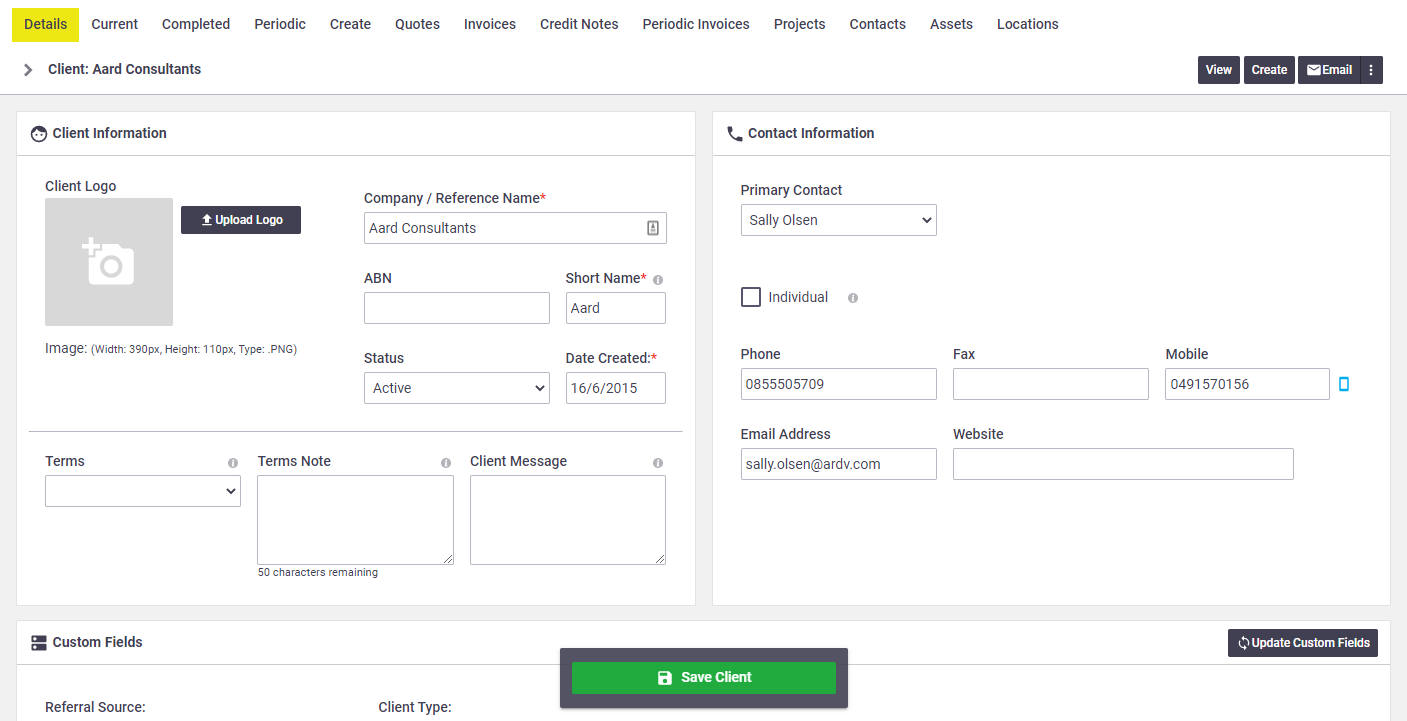
The client card is where you can edit client details, such as:
To edit client details, click Accounts > Clients and click the name of the client you want to edit. |
 |
 |
Information and Settings
The below are fields you're able to edit once a client has been created. Information on Contact Information, Company Address, and Business Unit Links can be found on Create a Client. Remember to Save Client if making changes.
Client Information
| Setting/Option | Description |
|---|---|
| Client Logo |
Upload the client's logo. It can then be used on the print view of layouts. To upload your client's logo, click Upload Logo and browse for the logo on your local PC / device. |
| Status | By default, this is set to Active. If you no longer want to do any work for that client, set the client status to Archive. See below. |
| Date Created | The date this client was recorded in your business. You can change this date if it's different to the creation date in AroFlo (e.g. if you bulk imported a number of clients at once). |
Client-Specific Settings
| Setting/Option | Description |
|---|---|
| Client Rates | You can set client-specific charge-out rates and service and/or call-out fees. Client rates will override the default rates set by in Site Admin. Default service fees attached to Task Types can be overridden here as well. |
| Add Child Client | This opens up a blank client card so you can create a child client. Refer to Parent and Child Clients for more information. |
| Client Print and Email Defaults | Set up client-specific email templates, email settings and print layouts. |
| Client Settings and Defaults | Used for setting client-specific defaults and settings for invoice margins, minimum labour charges, task types, print layouts, email templates and tracking. |
| Email Import to Create Task | Used for configuring settings for importing work orders directly into AroFlo. This feature is most useful if you have a client that sends many jobs via email, always using the same template. |
| Event Messages | Set up client-specific event messages that override the default Event Message settings set in Site Administration. |
| Priority Settings | Set up client-specific priority settings that override the default Priority settings set in Site Administration. |
| Substatus Settings | Set up client-specific substatus settings that override the default substatus settings set in Site Administration. |
General Settings
| Setting/Option | Description |
|---|---|
| System access |
This setting allows clients to log in to AroFlo so that they can create and view their own tasks. By default, this is set to Disabled. You can enable access via the dropdown menu. |
| Set Parent Client | Click this checkbox if you want to select a client to set as the parent of the current client. Refer to Parent and Child Clients for more information. |
| Merge Clients | Use this option if you have a duplicate client that you need to merge with this one. See Merge Clients, below. |
Tabs
Task Notes
Use this to record notes that you want to automatically include on quotes and tasks created against the client.
Documents & Photos
Upload documents or photos to the client card. For example, an electrician may upload a photo of the client's switchboard, for planning future work for them.
Account Managers
Used to assign an Account Manager to the client. This feature can be enabled in Site Admin > Settings > Client Settings.
Stored Payment Types
Add/edit stored payment types for this client. This may be useful if you do recurring or periodic work for certain clients.
Custom Fields
If custom fields have been set up for clients, you may need to update existing cards to show any new custom fields created.
Merge Clients
|
If you have two clients that are the same, you can use the Merge Clients feature. This will retain information from the client you merge with and transfer it to the client you're doing this from, as well as archive the other client.
This will merge your duplicated client's info with this one as well as things associated with that client, e.g. tasks, quotes, assets, contacts and locations. Client-Specific Settings of the client you select to merge into this one will not be transferred across but any Client-Specific Settings of the client you're on will remain. If necessary, go to the archived Client card to access any missing info (see below). |
 |
 |
Archive a Client
If a client is no longer needed, you can archive them. Alternatively, if the client is a duplicate of another one, you can merge it into the other one. See above.
- In the Client Information area, change the Status to Archived.
- Save Client.
View archived Clients
| To view archived clients, in the Clients list, change the filter to Archived. |  |
 |
Reactivate archived Client
To reactivate an archived client, open the client card and change the status to ‘Active’ and Save.
Working with multiple business units
The above will only archive/reactivate the client for the business unit you're in. If you want to archive the client for all business units, select ‘Archive in all business units’ before saving.
Similarly, select 'Activate in all business units’ if you need to reactivate an archived client for all business units. This works both if the client is archived in all business units or just some.
Use the Business Unit Links section to check if the client is active, archived, or not linked to other business units.

 (magnifying glass) to find and select the relevant client