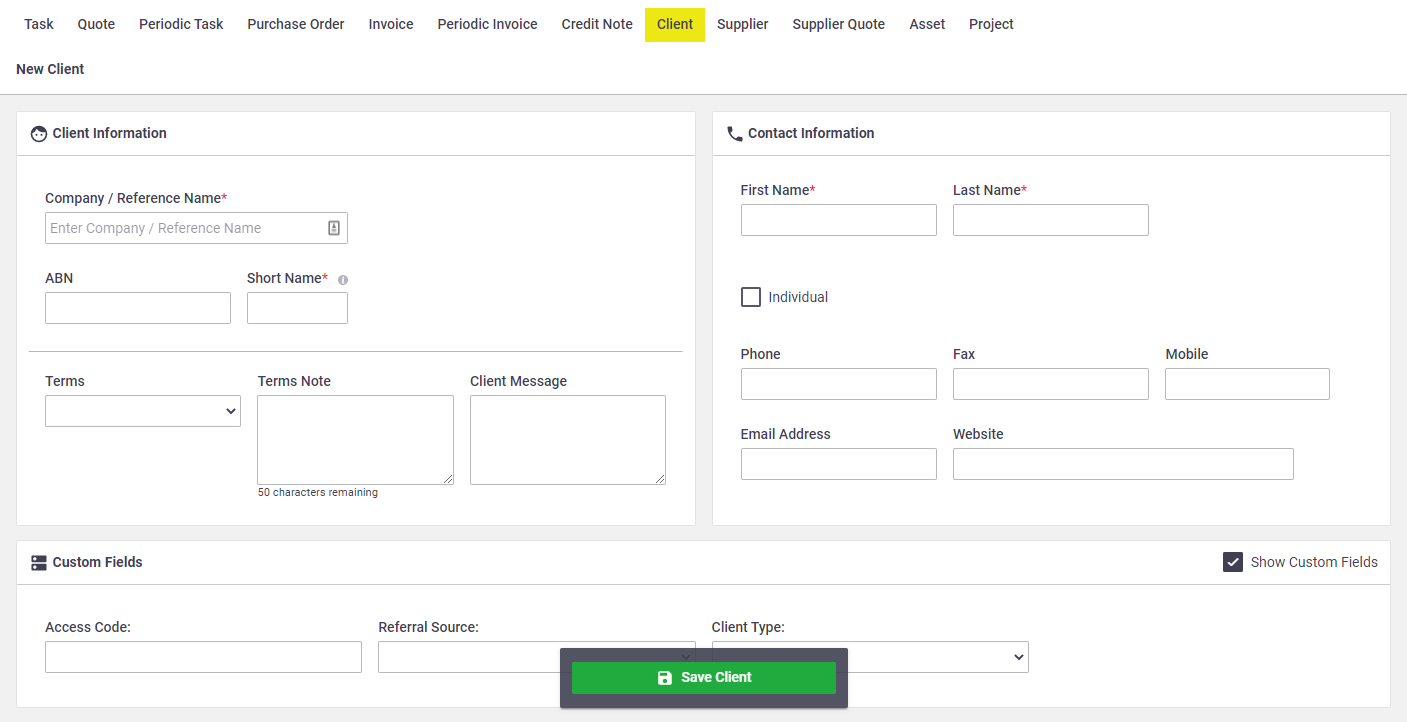
The fastest way to create a client is by going to Create > Client on the main menu.
By default, AroFlo comes with a Training Client. You can use this to separate all of your training data, or simply use it as a 'dummy' client.
|
There are four mandatory fields on the client card:
All other fields are optional, but the more fields you complete, the better data quality you'll have. All the fields are explained in the table below each image. Multi-character input You can use character-based languages (e.g. Mandarin, Japanese, Korean, Arabic, Greek, and Turkish) in text fields, if necessary. From within a client card, you can see a separate menu below the main menu. This gives you access to all the tasks, quotes, purchase orders and other records related to that client. |
 |
 |
You can create a client from within any client search area in AroFlo. Look for the Add Client button in search screens.
Client and Contact Information
Click the expand below for information on the fields in the Client Information and Contact Information sections of the client card.
Client and contact information fields explained
| Field | Description |
|---|---|
| Company/Reference Name | This is the primary name for the client company. If the client is an individual, see the Individual section, below. Duplicate Client Names When you create a client or supplier with a Company/Reference Name that already exists, a warning message will appear with the options to 'View the Existing Client/Supplier', 'Save Client/Supplier' or 'Cancel'. If you use an accounting integration link, we recommend you check your accounting package to see if it accepts duplicate Client and/or Supplier names. |
| ABN | Record your client's national business taxation number (e.g. in Australia, the Australian Business Number). |
| Short Name |
AroFlo creates a short name automatically once you've entered a Company / Reference Name. You can override the name AroFlo creates by typing over it. This field is a secondary identifier for this client. All tasks created against this client will reference this short name. |
| Terms | Select the transaction terms for this client from the dropdown box.
Show banner |
| Terms Note | Use this field to record any specific information related to trading terms for this client. |
| Client Message | You can enter generic comments here. This information is displayed on the invoice worksheet and can be moved onto the invoice layout if required. |
| First/Last Name | First and last name of the primary contact at the client company, or of an individual for non-business clients. For business clients, you can change this name if the contact person changes. |
Individual |
If your client is an individual rather than a company, complete the First Name and Last Name fields and then check this box. AroFlo will update the Company / Reference Name field to match the first and last name you entered, in accordance with your naming convention set in Site Admin. |
| Phone | Primary phone number of the client. |
| Fax | Primary fax number of the client. |
| Mobile | Primary mobile phone number of the client. |
| Email Address | Primary email of the client. If not an individual, this could include the client's Accounts Payable address. |
| Website | Primary website of the client. |
Custom Fields

Fill out any relevant custom fields which may appear. These can be left and filled out later if necessary.
Client Company Address
The table below explains how to use the fields in the Company Address, Mailing Address, and Business Unit Links sections of the client card.

Client address fields explained
| Field | Description |
|---|---|
| Location Name | Use this field to record the specific details of an address, e.g. 1st Floor, Building G. Powered by Google Field This field is powered by Google and will suggest results as you type. You can also click the |
| Address (No & street), City, State, Postcode, Country | Record the company's physical address in these fields. The Address (No & street) field is powered by Google, just like the Location Name field. Just enter the street address and make a selection from the list Google presents. The City, State, Postcode and Country fields will auto-populate. Multiple locations If the client has multiple locations, use this area to record the primary location such as a head office. To create additional locations once you've saved your client, see Locations.
|
|
GPS Coordinates Auto-Generate, View on Map |
If you did not select an address from Google's suggestions (e.g. if you filled out the fields manually, or if you bulk imported clients), click Auto-Generate to populate the latitude and longitude of the client's address, or click View on Map and move the pin to the location you want, then click Use Coordinates. You can use this feature to assist with scheduling a task to the nearest resource, and Field staff can use it to help them find the work site when they're on the road. |
| Mailing Address | If the mailing address is different from the billing address (e.g. if you want to add a Post Office Box address), tick Use different mailing address to access the Mailing Address information. Powered by Google Field This field is also powered by Google and will suggest results as you type. You can also click the |
|
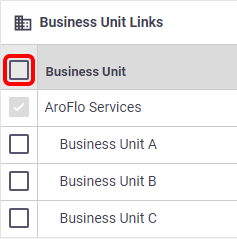
Business Unit Links |
If your business has multiple business units, you can use this section to decide whether the client should appear within all business units or not. To have a client appear in all business units, click the box at the top of the list. To have a client appear only in some business units, check only the relevant boxes. Your Site Administrator can set up default business unit links so that all newly created clients will have the links you want. See Client Settings.  |
Once you've created and saved a client, you'll have more options available to edit, such as adding the client's logo, client-specific settings, and enabling Client Access. See Edit Client Details for more information.
 (GPS pin) icon to fill in details based on your current location.
 (GPS pin) icon to fill in details based on your current location.