|
To view your client list, go to Accounts > Clients. Click on either the Client name to access the Client Card or the Primary Contact to open the contact card. |
 |
 |
Column descriptions
Column Label |
Description |
|---|---|
| Client | The primary name entered for client. Parent and Child Clients will also appear with the parent client listed in the format 'Parent Client > Child Client'. For example: Facilities management company > Strata Plan client |
| Address, Suburb, State, Postcode | The company's physical address. |
| Primary Contact | The person listed as being the primary contact at the company. |
| Phone | Primary phone number of the client (clickable). |
| Fax | Primary fax number of the client. |
| Mobile | Primary mobile phone number of the client (clickable). Use the |
| Primary email of the client. | |
| Map | If GPS co-ordinates have been Auto-Generated, you can click on the |
Reorder Columns
|
You can reorder each of the columns to suit your preference by clicking and dragging a column heading and moving it across the page. AroFlo will save this order. To return to the AroFlo default column order, click the |
 |
 |
Search for clients, locations and contacts
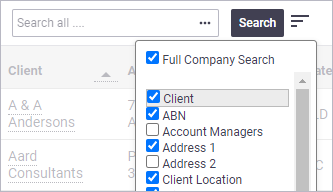
Simply enter a keyword (min. 3 characters) into the search field and click Search.

For a deeper search, click the  (filters) icon and select additional search areas and fields. (filters) icon and select additional search areas and fields. |
 |
 |
Other Options
Create Client
The Create Client button will take you to the New Client window in the same way as if you use the Create > Client, or Accounts > Clients > Create main menu options.
Active/Archived filter
Toggle between active and archived clients by clicking the down arrow on this filter.
Bulk import clients
To easily import clients, click the  icon to use the Import Assistant. You can also upload a file instead if you wish. See Import Assistant.
View and Create Menu
View Menu
The View menu gives you quick access to the various lists of Tasks, Quotes, Periodics, etc for that client.
Click on the View menu and select one of the following options:
View Menu Options
- Quotes
- Tasks
- Periodics
- Invoices
- Credit Notes
- Periodic Invoices
- Projects
- Contacts
- Assets
- Locations
- Reports
- Certifications
Create Menu
The client list Create menu has similar options to the main Create menu but will pre-set the client for you.
Click Create and select one of the following options:
Create Menu Options
- Quote
- Credit Note
- Task
- Periodic
- Location
- Project
- Contact
 (A-Z) icon.